🩺 Station 3 — Glucose Tolerance Test
AIM OSPE/OSCE Lab — Practical Station | KMU Style | MBBS Practical + Viva
📋 Complete OSPE Station Content
OSPE Station Name
Station 3 — Glucose Tolerance Test
Module: Neuroscience
Year: 2nd Year MBBS
Subject / Integration: Physiology / Biochemistry / Clinical Integrated
Learning Target
By the end of this station, the student should be able to:
- Describe the correct procedure and timing of samples in an oral glucose tolerance test.
- Interpret a glucose tolerance curve as normal, impaired, or diabetic pattern.
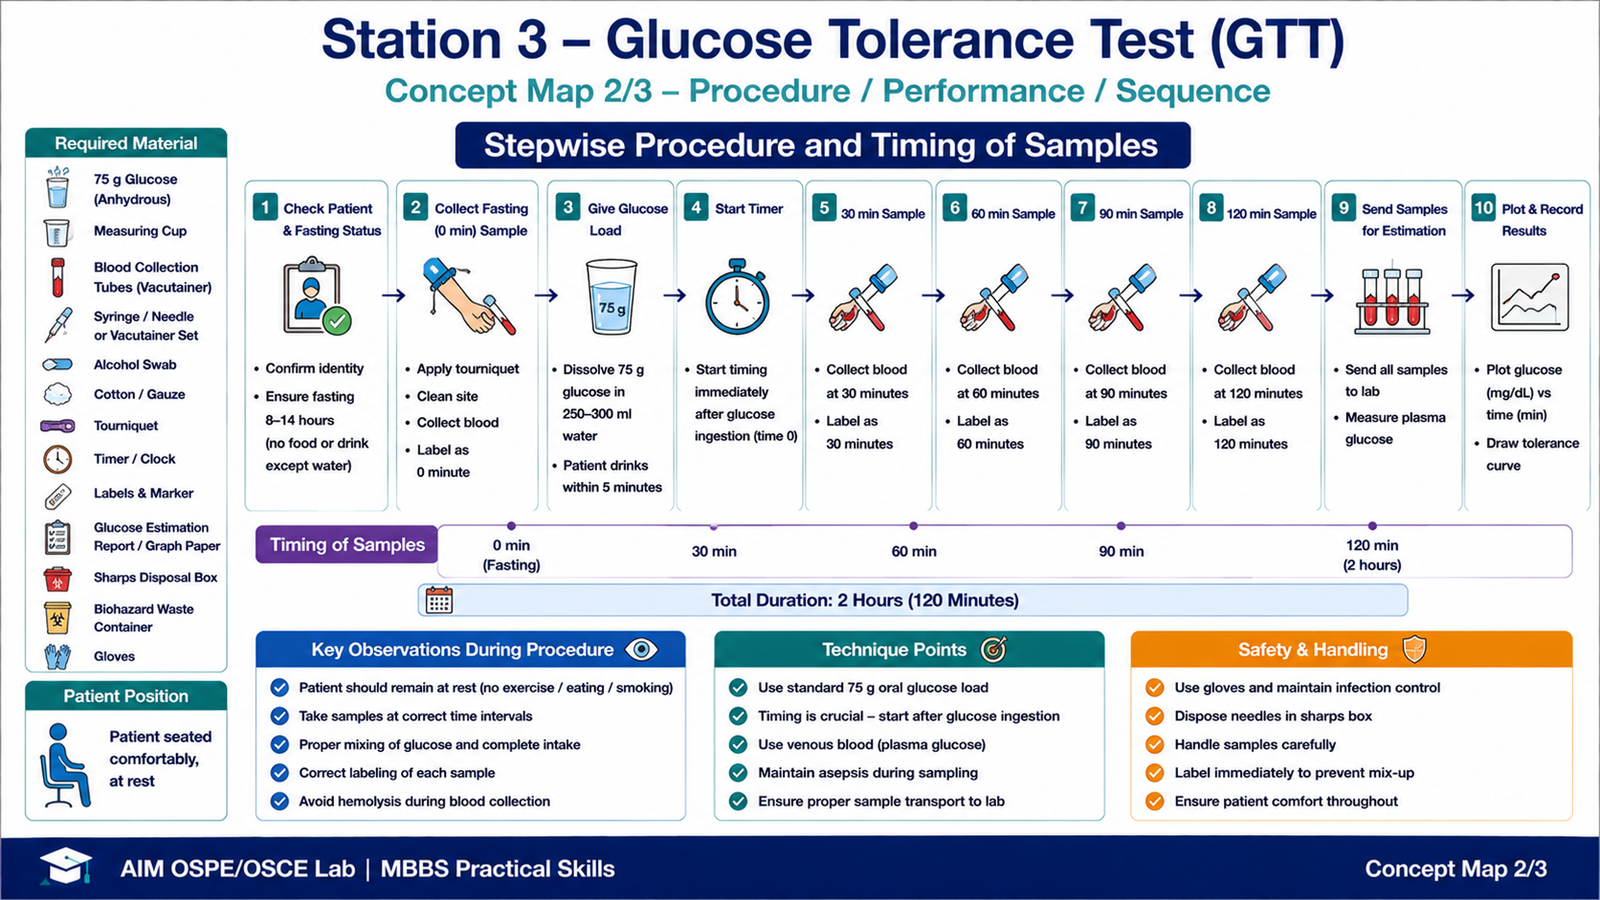
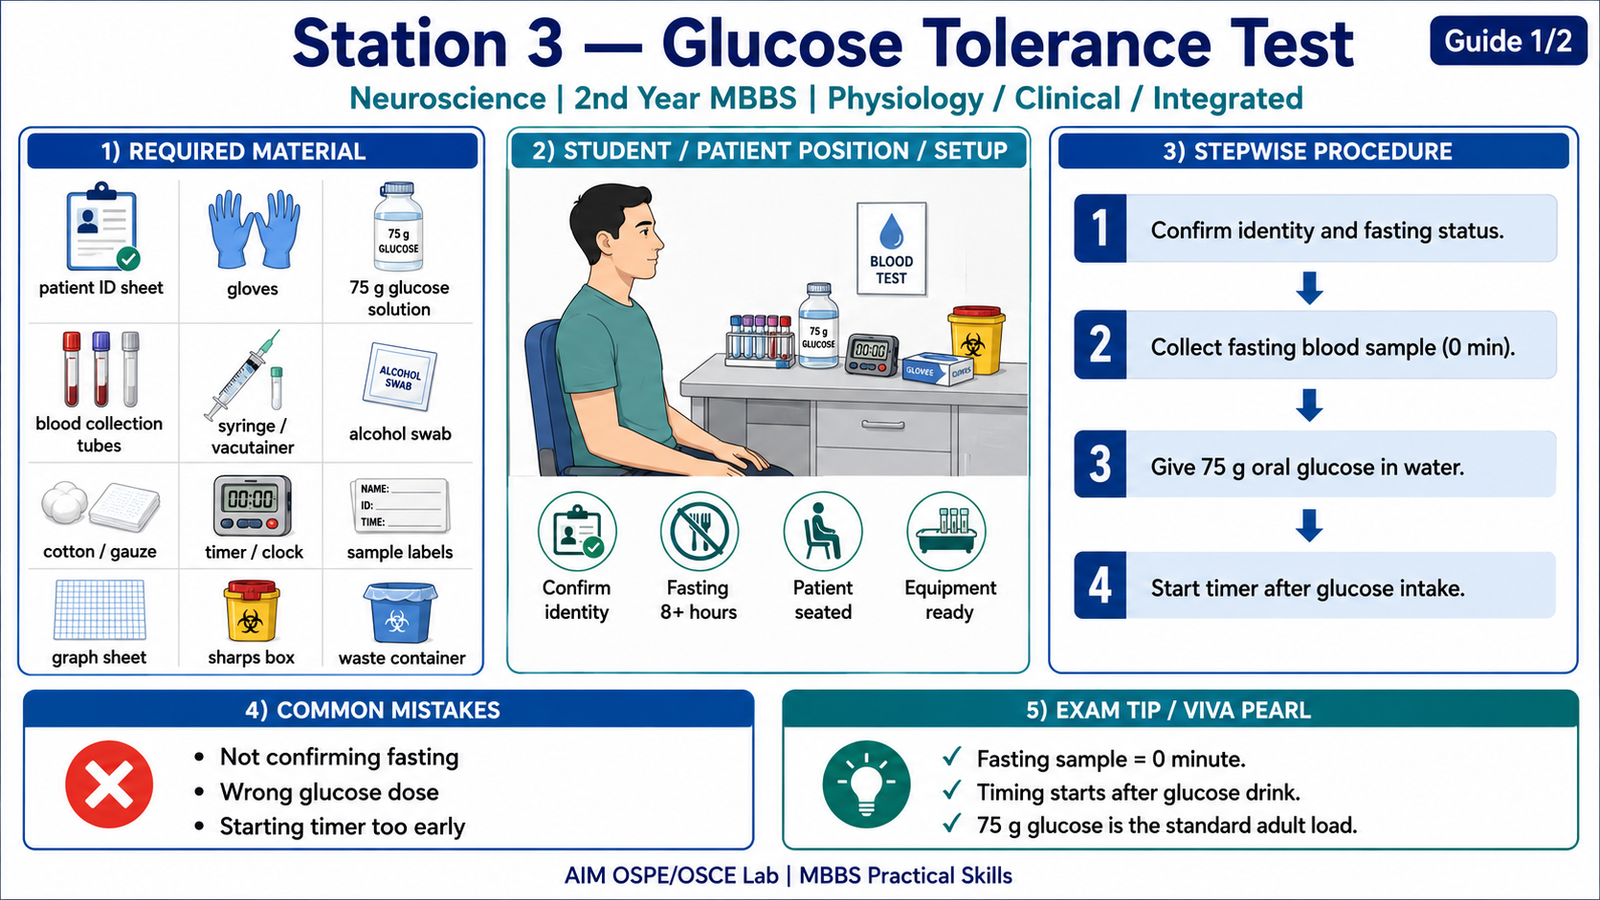
Required Material
- Patient/sample identification sheet
- Gloves
- Glucose solution: 75 g glucose in water
- Blood collection tubes
- Syringe/needle or vacutainer system
- Alcohol swab
- Cotton/gauze
- Tourniquet
- Timer/clock
- Sample labels
- Glucose estimation report sheet
- Graph paper / glucose curve chart
- Sharps box
- Biohazard waste container
Student Task / Procedure
- Confirm patient identity and fasting status.
- Ensure the patient has fasted for at least 8 hours.
- Collect the fasting blood sample.
- Label it as 0 minute / fasting sample.
- Give 75 g oral glucose dissolved in water.
- Start the timer immediately after glucose intake.
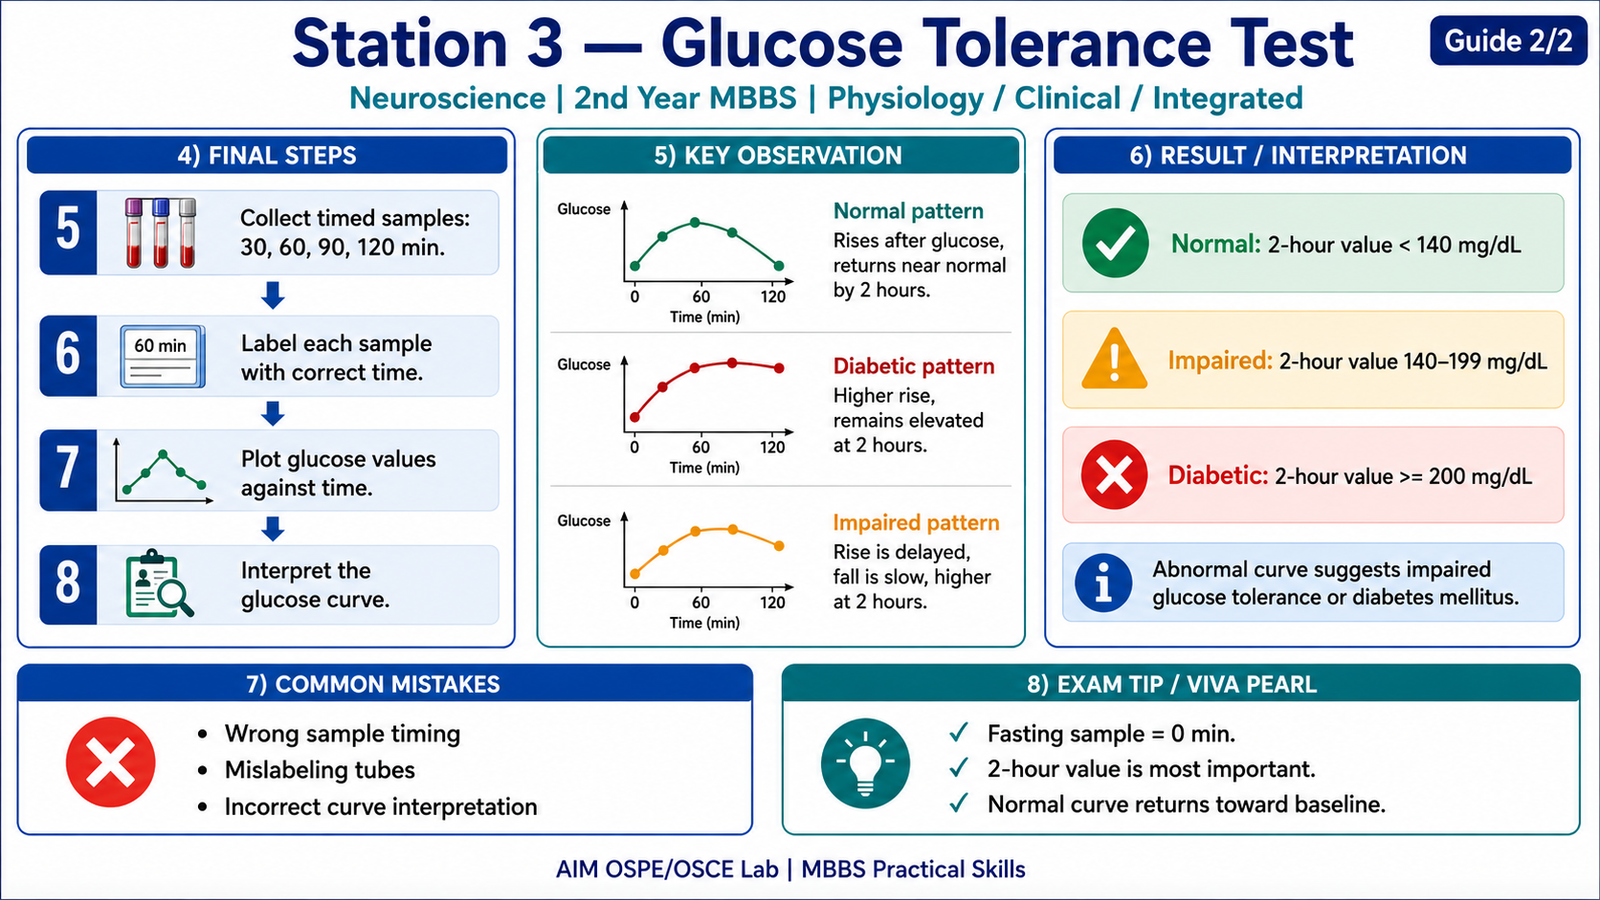
- Collect timed blood samples as instructed, commonly at 30, 60, 90, and 120 minutes for curve demonstration.
- Label each sample with the correct time.
- Plot blood glucose values against time.
- Interpret the glucose tolerance curve as normal, impaired, or diabetic pattern.
Observation / Identification Points
The student should observe, identify, or demonstrate:
- Correct confirmation of fasting status
- Correct identification and labeling of samples
- Correct timing of blood samples
- Proper use of 75 g oral glucose load
- Accurate plotting of glucose values on graph
- Recognition of normal glucose curve
- Recognition of diabetic glucose curve
- Safe handling and disposal of blood sample material
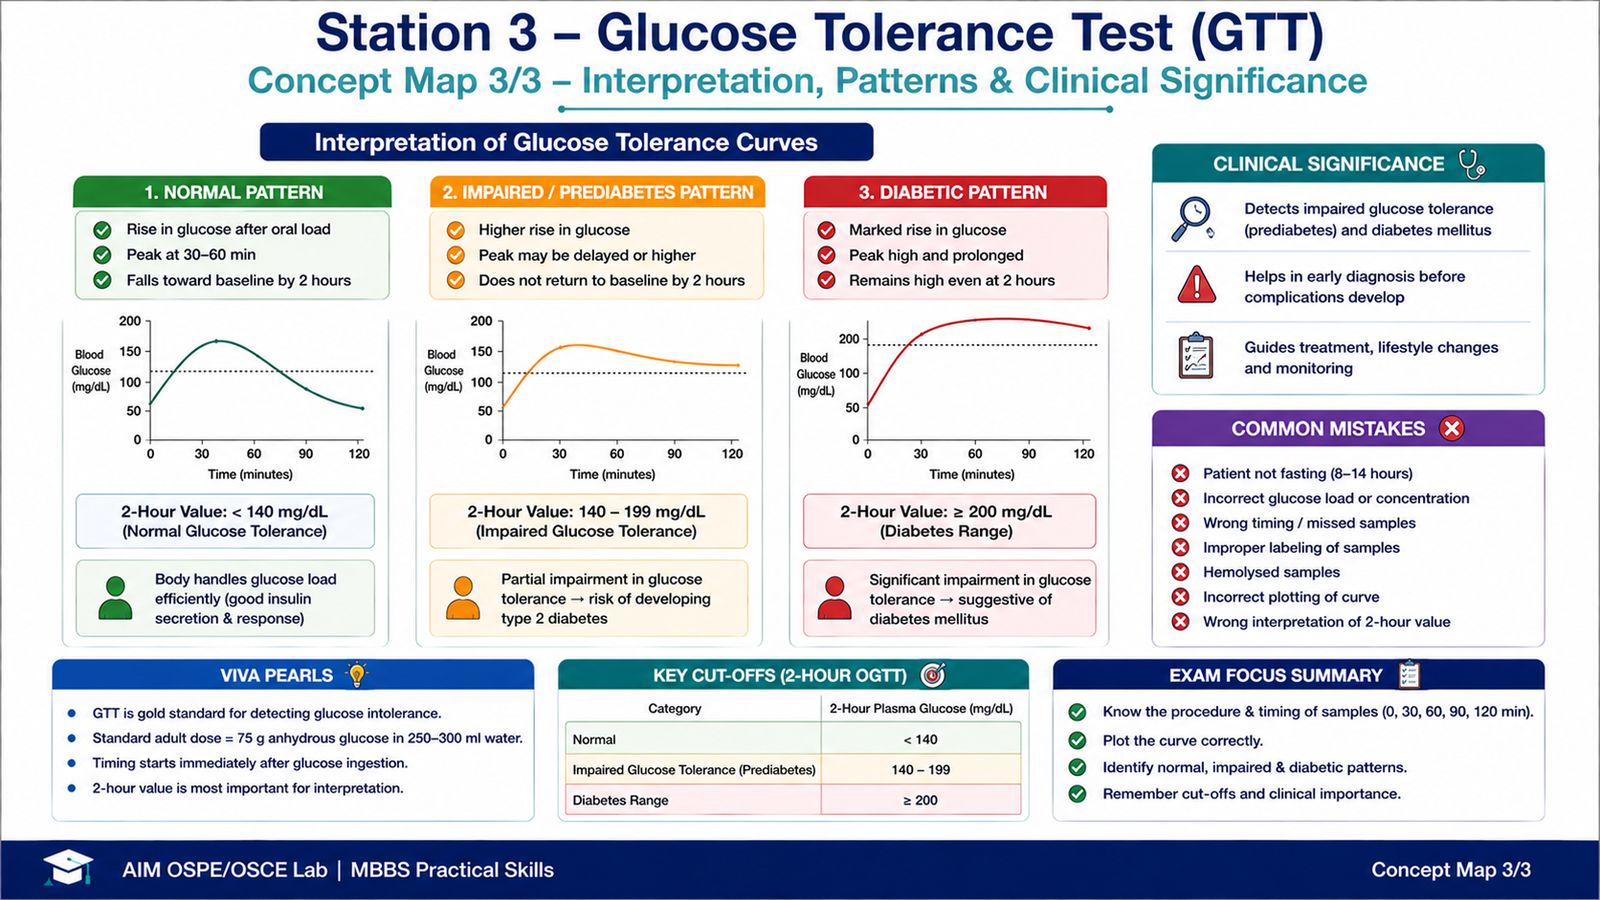
Result / Interpretation
Normal Glucose Tolerance Curve
- Fasting glucose is within normal range.
- Blood glucose rises after oral glucose intake.
- Peak usually occurs around 30–60 minutes.
- Blood glucose falls back toward normal by 2 hours.
- A 2-hour OGTT value less than 140 mg/dL is considered normal.
Impaired Glucose Tolerance / Prediabetes Pattern
- Blood glucose rises higher than normal.
- Return toward baseline is delayed.
- A 2-hour OGTT value of 140–199 mg/dL is in the prediabetes range.
Diabetic Pattern
- Fasting glucose may be high.
- Glucose rises excessively after glucose load.
- Blood glucose remains high at 2 hours.
- A 2-hour OGTT value of 200 mg/dL or higher is in the diabetes range and usually requires confirmation.
Principle
The glucose tolerance test assesses the body’s ability to handle an oral glucose load. After glucose intake, blood glucose rises and then falls due to insulin-mediated uptake of glucose by tissues.
Clinical Significance
GTT helps detect impaired glucose tolerance and diabetes mellitus, especially when fasting glucose alone is not enough. The American Diabetes Association describes OGTT as a two-hour test comparing glucose before and after a sweet glucose drink to assess how the body processes sugar.
Viva Questions
1. What is the purpose of the glucose tolerance test?
Ideal Answer: It assesses how the body handles an oral glucose load and helps detect impaired glucose tolerance or diabetes mellitus.
2. How much glucose is given in the standard adult OGTT?
Ideal Answer: 75 g oral glucose dissolved in water.
3. Which sample is collected first in GTT?
Ideal Answer: The fasting or 0-minute blood sample.
4. What is the normal 2-hour OGTT value?
Ideal Answer: Less than 140 mg/dL.
5. What 2-hour OGTT value suggests diabetes range?
Ideal Answer: 200 mg/dL or higher, usually requiring confirmation.
Common Student Mistakes
- Forgetting to confirm fasting status before starting the test
- Incorrect labeling of timed blood samples
- Starting the timer before the patient drinks glucose
- Confusing impaired glucose tolerance with diabetic pattern
- Not plotting the glucose curve correctly
AIM Feedback
You performed this station well if you understood the sequence: fasting sample, glucose load, timed blood samples, plotting, and interpretation. In OSPE, the examiner mainly checks whether you know the correct timing and can identify the curve pattern. Remember: a normal curve rises and returns toward normal by 2 hours, while a diabetic curve rises higher and remains elevated at 2 hours.
🖼️ Visual / Image Support
🧩 Concept Map / Interpretation Support