
Course Content
👁️ Station 1 — Ophthalmic History Taking
• Take a structured history from a patient presenting with an ocular complaint. • Identify the chief ocular complaint and its duration. • Explore relevant associated ocular symptoms. • Obtain relevant previous ocular, medical and treatment history. • Present the important findings of the ocular history in a concise clinical format.
0/1
🔤 Station 2 — Visual Acuity Examination
• Correctly position the patient and visual-acuity chart. • Assess distance visual acuity in each eye separately. • Record visual acuity correctly. • Use pinhole assessment where appropriate. • Interpret an abnormal visual-acuity result.
0/1
🔦 Station 3 — Pupillary Examination
• Inspect pupil size, shape and symmetry. • Assess direct pupillary light reflex. • Assess consensual pupillary light reflex. • Assess the pupillary response systematically. • Recognize an abnormal pupillary response.
0/1
👀 Station 4 — Visual Field Examination by Confrontation
• Position the patient correctly for confrontation testing. • Examine each eye separately. • Assess the major visual-field quadrants systematically. • Compare the patient's visual field with the examiner's field. • Identify the presence of a gross visual-field defect.
0/1
🔬 Station 5 — Slit-Lamp and Anterior Segment Examination
Integrated KMU activities: 5. Slit-Lamp Examination 6. Anterior Segment Examination Learning Objectives The student should be able to: • Identify the major parts/components of a slit lamp. • Explain the basic purpose of slit-lamp examination. • Position the patient appropriately. • Examine the anterior segment systematically using the slit lamp. • Identify important anterior-segment structures during examination.
0/1
🩺 Station 6 — Direct Ophthalmoscopy and Fundus Examination
• Demonstrate correct handling of the direct ophthalmoscope. • Position themselves and the patient appropriately. • Perform direct ophthalmoscopy systematically. • Visualize the optic disc and retinal background. • Describe important fundus findings seen during examination.
0/1
📊 Station 7 — Interpretation of Common Ophthalmic Investigations
The student should be able to: • Identify a presented ophthalmic investigation. • Describe the basic information provided by OCT. • Interpret common visual-field findings. • Recognize the role/output of ocular biometry. • Interpret basic B-scan findings. • Recognize FFA and corneal-topography images and state their clinical use.
0/1
👁️ Station 8 — Ptosis Examination
• Inspect a patient with suspected ptosis. • Compare eyelid position between both eyes. • Perform a systematic clinical assessment of ptosis. • Identify important abnormal findings. • Record and communicate the findings appropriately.
0/1
👓 Station 9 — Examination of Common Lid Abnormalities
• Examine the eyelids systematically. • Recognize ectropion. • Recognize entropion. • Identify chalazion. • Identify stye. • Differentiate common lid abnormalities from one another on clinical examination or photographs.
0/1
👁️ Station 10 — Proptosis Examination
• Recognize the presence of proptosis. • Compare both eyes for symmetry. • Perform a structured ocular examination in a patient with proptosis. • Assess relevant associated ocular findings. • Present the examination findings systematically.
0/1
💧 Station 11 — Topical Anaesthesia, Fluorescein Staining and Corneal Assessment
• Demonstrate appropriate use of topical ocular anaesthesia. • Demonstrate fluorescein staining of the ocular surface. • Examine the stained cornea appropriately. • Identify a superficial corneal abnormality/foreign body when presented. • Explain the purpose of corneal scraping in suspected corneal infection.
0/1
💦 Station 12 — Lacrimal Regurgitation Test
• Explain the purpose of the lacrimal regurgitation test. • Position the patient appropriately. • Perform the test correctly. • Observe for reflux from the lacrimal puncta. • Interpret a positive or negative result.
0/1
🚨 Station 13 — Ocular Trauma and Chemical Eye Injury First Aid
• Perform an initial assessment of an ocular-trauma patient. • Identify the need for urgent eye first aid. • Demonstrate immediate management of chemical eye injury. • Perform appropriate eye irrigation/eye wash. • Explain essential precautions during initial ocular-trauma management.
0/1
🔍 Station 14 — Optic Disc Examination: Normal, Glaucomatous and Swollen Disc
• Identify and describe a normal optic disc. • Examine or interpret the optic disc systematically. • Recognize features of a glaucomatous disc. • Recognize a swollen optic disc. • Differentiate a normal disc from major abnormal disc appearances.
0/1
🩸 Station 15 — Retinal Lesions and Retinal Vascular Disease
• Inspect a retinal photograph/fundus image systematically. • Detect common retinal abnormalities. • Recognize common retinal vascular abnormalities. • Differentiate common retinal vascular conditions from one another. • Describe the important visual findings presented.
0/1
⚠️ Station 16 — Recognition of Retinal Detachment
• Recognize retinal detachment in a clinical image. • Describe the abnormal retinal appearance. • Distinguish detached retina from a normal retinal appearance. • Identify retinal detachment as a significant cause of visual loss. • Communicate the finding clearly in an OSCE setting.
0/1
📈 Station 17 — Tonometry and Glaucoma Assessment
• Identify the Goldmann applanation tonometer. • Explain the purpose of tonometry. • Describe the basic method of Goldmann tonometry. • Interpret an intraocular-pressure reading in the clinical context. • Relate tonometry to assessment of glaucoma.
0/1
🌫️ Station 18 — Cataract Examination and Recognition
• Perform a basic ocular assessment for cataract. • Recognize the presence of cataract on ocular examination. • Describe the abnormal lens appearance. • Differentiate a clear lens from a cataractous lens. • Recognize adult and congenital cataract when presented clinically or visually.
0/1
↔️ Station 19 — Extraocular Movements and Ocular Motor Examination
• Inspect ocular alignment. • Examine extraocular movements systematically. • Test the major directions of gaze. • Identify limitation of ocular movement. • Recognize an abnormal ocular-motility pattern during examination.
0/1
🔁 Station 20 — Squint Examination: Cover Tests and Squint Pattern
• Assess ocular alignment. • Perform the cover test. • Perform the uncover test. • Perform the alternate-cover test. • Identify the presence of manifest or latent deviation from the examination. • Differentiate an esotropia pattern from an exotropia pattern.
0/1
AIM OSPE/OSCE Lab — Ophthalmology Module | 4th Year MBBS
AIM OSCE / OSPE • MBBS

Station 02 — Visual Acuity Examination

4th Year • Eye • Rapid Revision • Practical Skills • Viva

🎯 Candidate Task

Assess the patient’s distance visual acuity in each eye separately using the provided visual-acuity chart. Record your findings correctly and perform pinhole testing if indicated.

⚡ Model Station Answer

  • I assessed each eye separately at the correct chart distance, using the patient’s usual distance correction where appropriate.
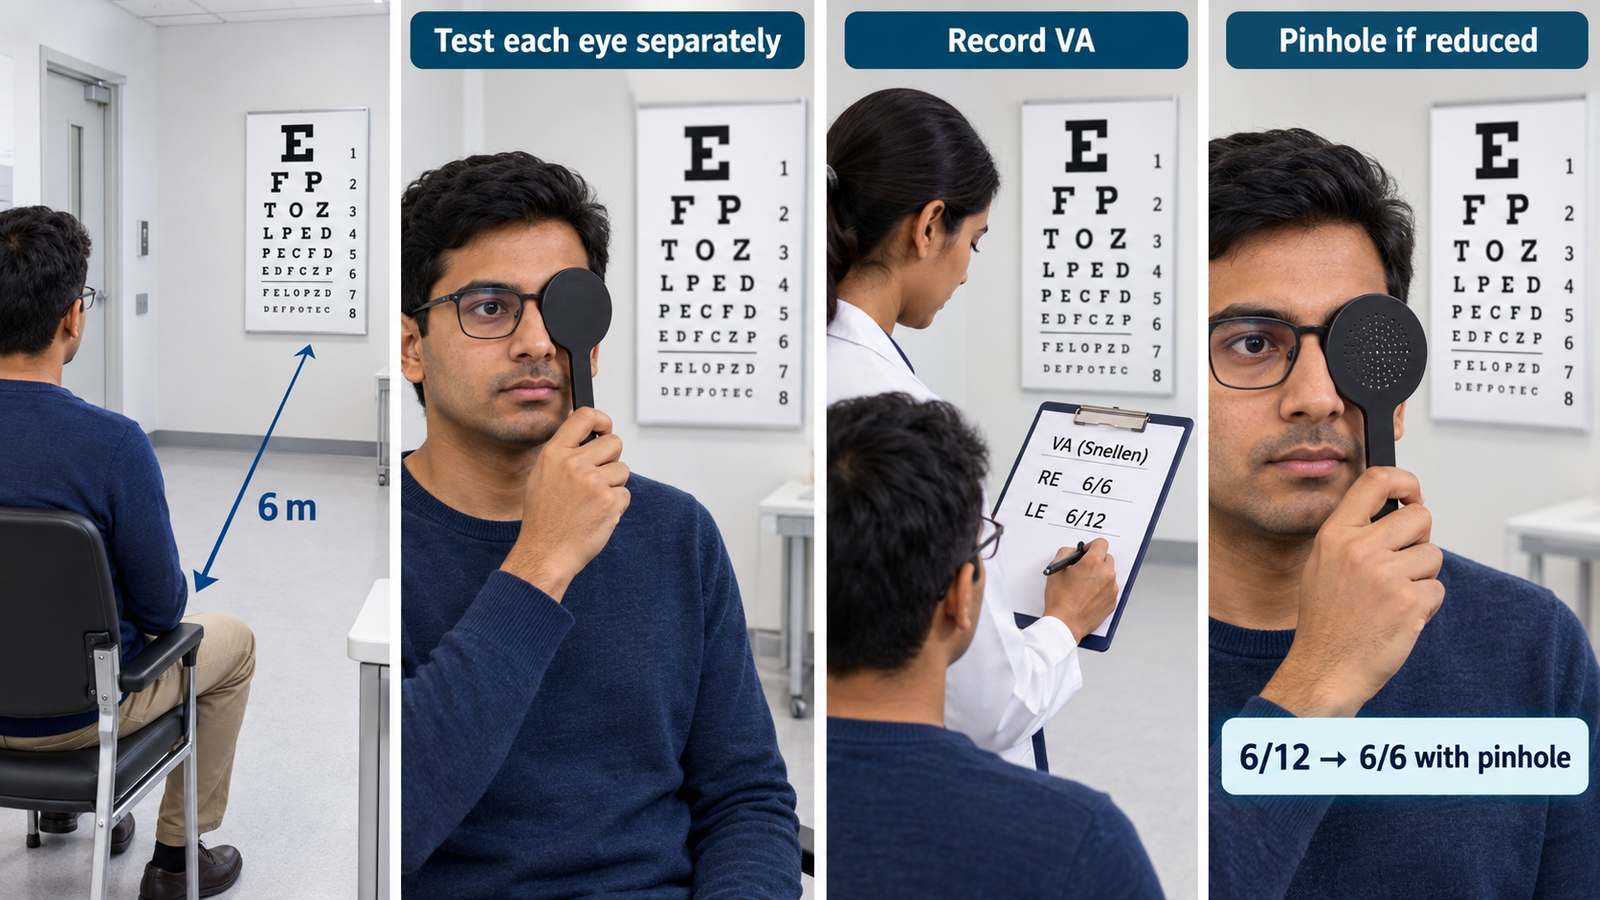
  • I would record the acuity for each eye separately, for example Right eye 6/6, Left eye 6/12.
  • If acuity is reduced, I would repeat testing through a pinhole.
  • Improvement with pinhole suggests that a refractive component is contributing to the reduced visual acuity.

🔎 How to Perform / Approach

  1. Prepare: Perform hand hygiene, introduce yourself, confirm the patient, explain the test and obtain consent.
  2. Position correctly: Seat or stand the patient 6 metres from a well-illuminated Snellen chart positioned approximately at eye level.
  3. Check correction: Ask whether the patient normally wears distance glasses; test with their usual distance correction when appropriate.
  4. Test one eye: Ask the patient to cover one eye without pressing on it and read the smallest line they can identify accurately.
  5. Record the result: Record the tested eye separately as a Snellen fraction such as 6/6, 6/9 or 6/12, and note whether it was unaided or with glasses.
  6. Repeat: Test the opposite eye using the same method.
  7. Use pinhole if reduced: Repeat the reduced eye through a pinhole and document the new acuity. Improvement supports a refractive cause; absent significant improvement requires further ocular assessment.
Exam point: The numerator represents the testing distance. The denominator represents the distance at which a person with standard vision can read that same line.

🖼️ Visual Learning

VISUAL 1

Visual Acuity Examination — Snellen Testing and Pinhole
 

🎥 Practical Demonstration

Clinical Skills for Undergraduates: Visual Acuity Assessment
Ophthalmology Department, Cairo University — practical undergraduate demonstration of visual-acuity assessment.

▶ Watch Demonstration

📝 Important Viva Questions

1. What does a visual acuity of 6/12 mean?

Answer: The patient can read at 6 metres what a person with standard visual acuity can read at 12 metres.

2. Why should each eye be tested separately?

Answer: Testing each eye independently detects unilateral or asymmetrical reduction in visual acuity that binocular testing may conceal.

3. When should a pinhole be used?

Answer: Pinhole testing is used when distance visual acuity is reduced to determine whether a refractive component is contributing.

4. What does improvement in visual acuity with a pinhole suggest?

Answer: Significant improvement suggests that the reduced acuity is at least partly due to refractive error.

5. How should visual acuity be documented?

Answer: Record each eye separately using the Snellen fraction and indicate whether testing was unaided, with spectacles or through a pinhole.

Scroll to Top
💬 WhatsApp Support