Course Content
🔬 Station 1 — Identification of Normal Blood Cells on Peripheral Smear
Learning Outcomes Identify normal RBCs, WBCs and platelets on a provided peripheral blood smear/image. Differentiate the major blood-cell lineages using their morphological features.
0/1
🔴 Station 2 — Abnormal RBC Morphology & Identification of Anemia
Learning Outcomes Differentiate normal from abnormal red blood cells on a peripheral smear. Identify common abnormal RBC shapes. Suggest the likely type of anemia from the provided RBC morphology.
0/1
💊 Station 3 — Prescription Writing for Iron-Deficiency Anemia
Learning Outcomes Write an appropriate prescription for a patient at risk of developing iron-deficiency anemia. Select an appropriate iron preparation and provide clear instructions for its use.
0/1
🩸 Station 4 — Safe Blood Transfusion & Recognition of Transfusion Reactions
Learning Outcomes Demonstrate the essential safety checks required before blood transfusion. Identify common transfusion reactions from a supplied clinical scenario. Describe the appropriate immediate response when a transfusion reaction is suspected.
0/1
⚪ Station 5 — Identification of White Blood Cells on Peripheral Smear
Learning Outcomes Identify the major types of white blood cells on a provided peripheral smear. Differentiate neutrophils, eosinophils, basophils, lymphocytes and monocytes using morphology. Recognize a smear demonstrating leukocytosis.
0/1
🔬 Station 6 — Microscopic Examination of Human and Animal Blood
Learning Outcomes Perform/interpret microscopic examination of provided human and animal blood specimens or images. Differentiate human from animal blood using the supplied microscopic features.
0/1
🔦 Station 7 — Examination of Blood Stains Under Ultraviolet Light
Learning Outcomes Demonstrate the correct approach to examination of a suspected blood stain using ultraviolet light. Recognize findings suggestive of a blood stain on the supplied material.
0/1
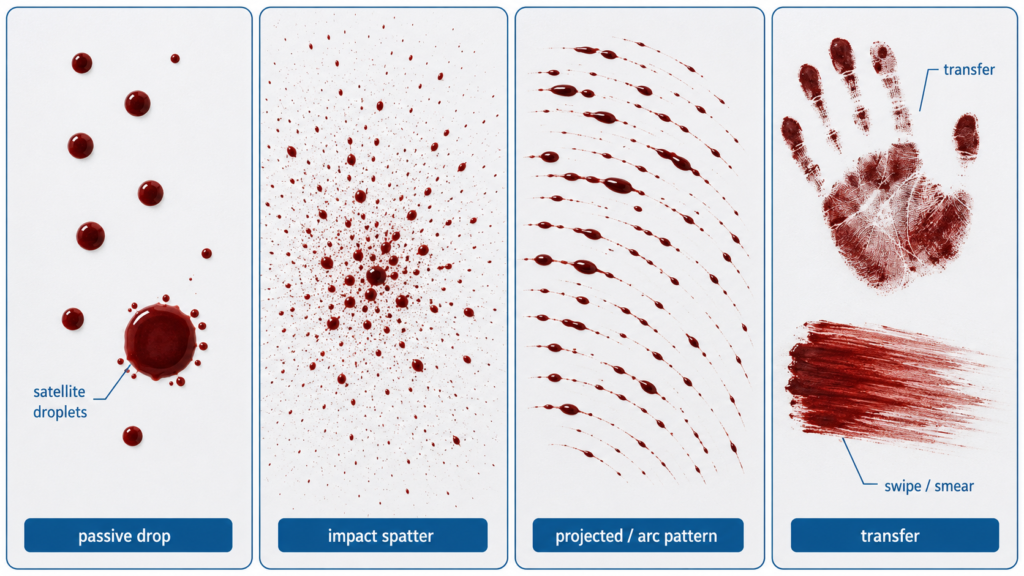
🩸 Station 8 — Identification of Blood-Stain Patterns
Learning Outcomes Identify different blood-stain patterns from supplied specimens/images. Differentiate the presented patterns on the basis of their gross appearance.
0/1
💉 Station 9 — EPI Vaccination, Route & Cold-Chain Assessment
Learning Outcomes Identify vaccines included in the Pakistan EPI schedule from provided material. Identify the appropriate route of administration of selected vaccines. Demonstrate/describe correct vaccine storage and maintenance of the cold chain. Recognize important contraindications to vaccination.
0/1
🧪 Station 10 — Interpretation of Coagulation Tests
Learning Outcomes Interpret PT and APTT from provided laboratory results. Interpret bleeding time and clotting time. Use the pattern of abnormalities to identify the likely defect in hemostasis.
0/1
🩸🔬 AIM OSPE/OSCE Lab — Blood & Immunology-II Module | 3rd Year MBBS

AIM OSCE / OSPE • MBBS

🔦 Station 7 — Examination of Blood Stains Under Ultraviolet Light

Rapid Revision • Practical Skills • Viva

🎯 Task

CANDIDATE TASK

You are provided with material bearing a suspected stain and an ultraviolet light source. Demonstrate the correct method of examining the stained area and state the finding that would make you suspect a blood stain.

⚡ Model Station Answer

What to say in the exam

Technique: I would first inspect the material in ordinary light, wear appropriate eye protection, reduce ambient light and systematically scan the suspected area with the ultraviolet light without touching the specimen.

Finding: Dried blood usually does not fluoresce under UV light. It absorbs light and may therefore remain dark against a fluorescent or lighter surrounding background.

Conclusion: The finding is suggestive of a possible blood stain but is not confirmatory; further forensic testing is required.

“`

🔎 Stepwise Procedure / Approach

“`

  1. Prepare safely. Wear gloves and appropriate UV-protective eyewear before switching on the ultraviolet source.
  2. Inspect in ordinary light. Observe the material first and note the location, colour, shape and extent of the suspected stain.
  3. Reduce ambient light. Darken the examination area sufficiently to improve visibility and contrast.
  4. Position the UV source. Direct the light towards the material without allowing the lamp or your hands to contact the suspected stain.
  5. Scan systematically. Move the beam slowly across the suspected area and compare it with adjacent unstained material.
  6. Look for contrast. A dried blood stain usually remains dark or non-fluorescent because blood absorbs the incident light.
  7. Document the area. Note or photograph the suspected stain and avoid unnecessary handling or contamination.
  8. Interpret correctly. Report the UV finding as a screening or locating observation and proceed to an appropriate forensic blood test for confirmation.
Safety: Never look directly into the ultraviolet source. Appropriate eye protection is required, and unnecessary prolonged UV exposure of biological evidence should be avoided.
Exam point: Do not say that untreated blood normally “glows” under UV light. The important observation is usually absorption with a dark/non-fluorescent appearance, especially when the surrounding substrate fluoresces.

🖼️ Visual Learning

UV Examination of a Suspected Blood Stain

VISUAL 1

Technique + Expected Appearance


🎥 Practical Video

🎥 Practical Demonstration — Forensic Alternate Light Sources
Source: MOVEED Forensiclight • Multi-band Light Sources (Forensic Alternate Light Sources)

This practical demonstration shows the use of forensic alternate-light sources for locating biological evidence and demonstrates the light-absorption principle relevant to blood, alongside fluorescence of other biological materials.


▶ Watch Practical Video

📝 Important Viva Questions

Q1. What is the principle behind examination of a blood stain with ultraviolet light?

Answer: Blood absorbs certain wavelengths of light rather than characteristically fluorescing, so the stain may appear darker than the surrounding illuminated material.

Q2. What appearance is expected from dried blood under UV light?

Answer: Dried blood generally remains dark or non-fluorescent, particularly when the surrounding substrate fluoresces and produces contrast.

Q3. Does examination under ultraviolet light confirm that a stain is blood?

Answer: No. UV examination is a screening or locating technique and cannot by itself confirm that the material is blood.

Q4. Why is reduced ambient light useful during the examination?

Answer: It improves visualization of fluorescence and absorption contrast between the suspected stain and the surrounding material.

Q5. What important safety precaution is required when using ultraviolet light?

Answer: Appropriate UV-protective eyewear must be worn and the examiner should never look directly into the UV beam.

Q6. Why should unnecessary prolonged UV exposure of biological evidence be avoided?

Answer: Excessive ultraviolet exposure can damage biological material, including DNA, and may compromise subsequent forensic analysis.

Q7. How may blood differ from some other biological stains when examined with an alternate light source?

Answer: Blood commonly absorbs light and appears dark, whereas some other biological materials may fluoresce. Neither appearance alone is sufficiently specific for definitive identification.

Scroll to Top
💬 WhatsApp Support