🩺 Station 10 — Bone Markings and Radiological Anatomy
AIM OSPE/OSCE Lab — Practical Station | KMU Style | MBBS Practical + Viva
📋 Complete OSPE Station Content
OSPE Station Name
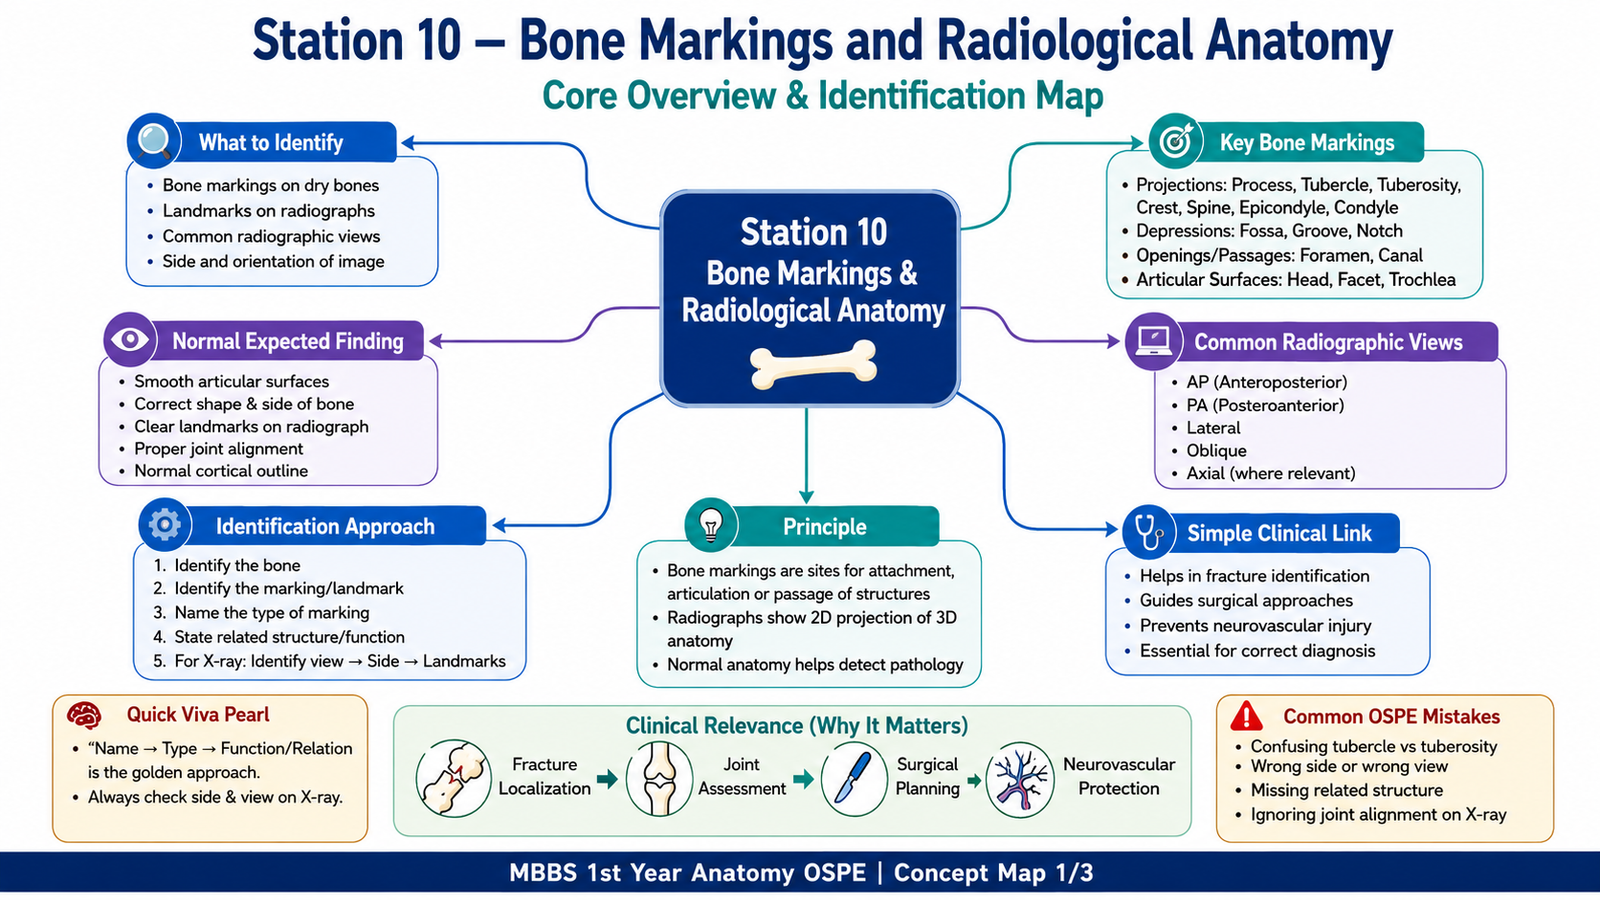
Station 10 — Bone Markings and Radiological Anatomy
Learning Target
By the end of this station, the student should be able to:
- Identify important bone markings and anatomical landmarks on bones and radiographs.
- Recognize common radiographic views and explain their basic clinical significance.
Required Material
- Dry bones commonly used in anatomy practicals
- Humerus
- Radius and ulna
- Femur
- Tibia and fibula
- Vertebrae
- Pelvis
- Skull
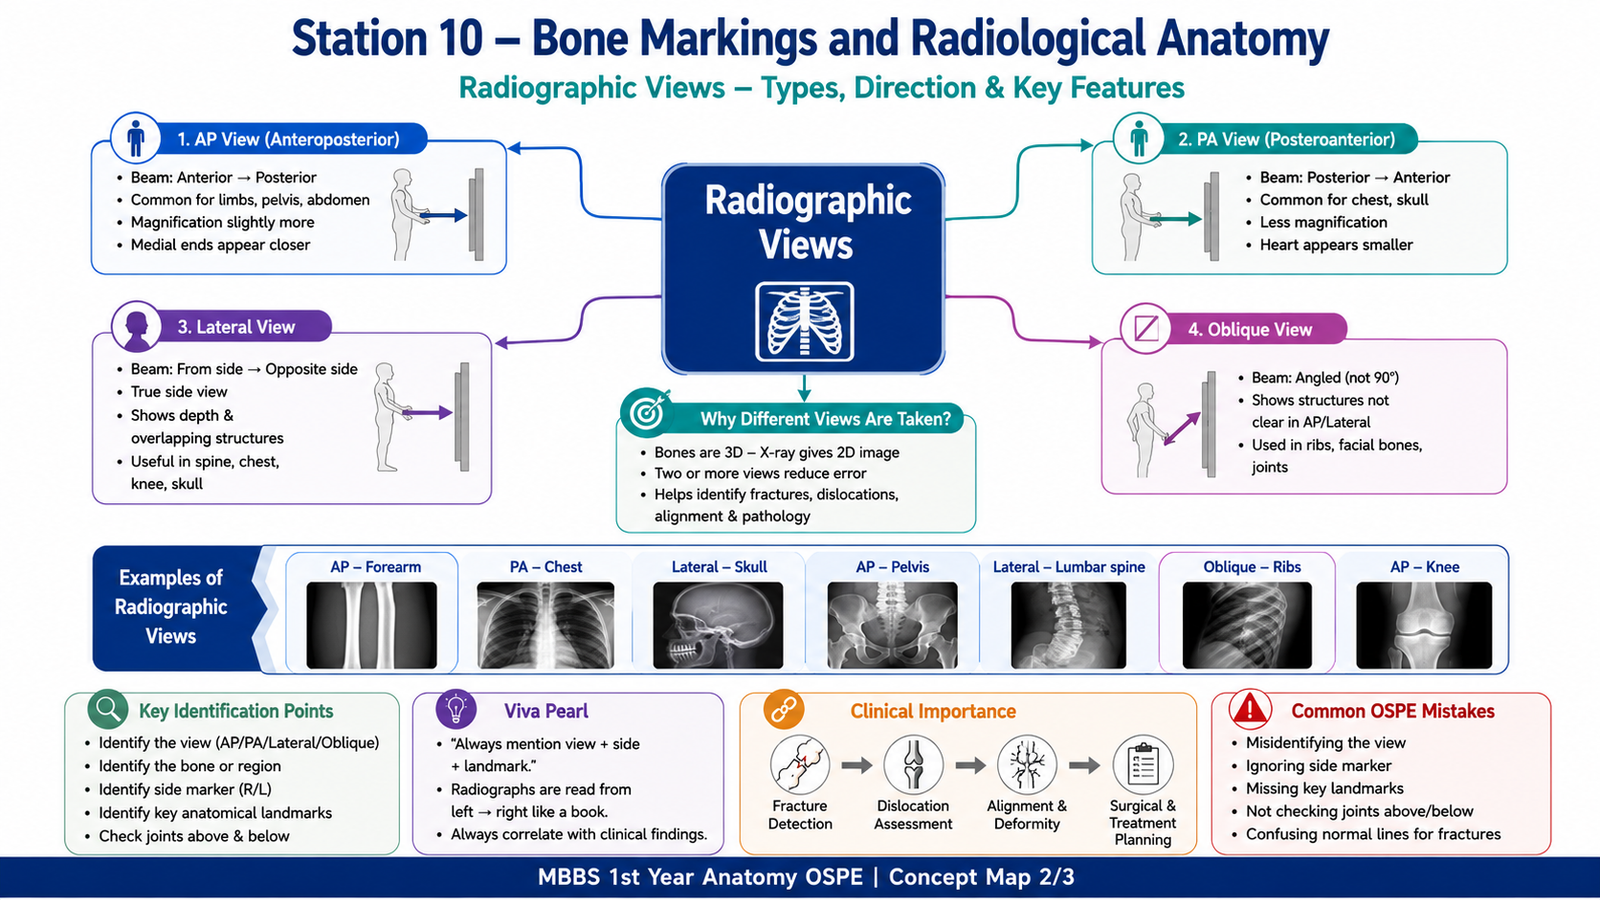
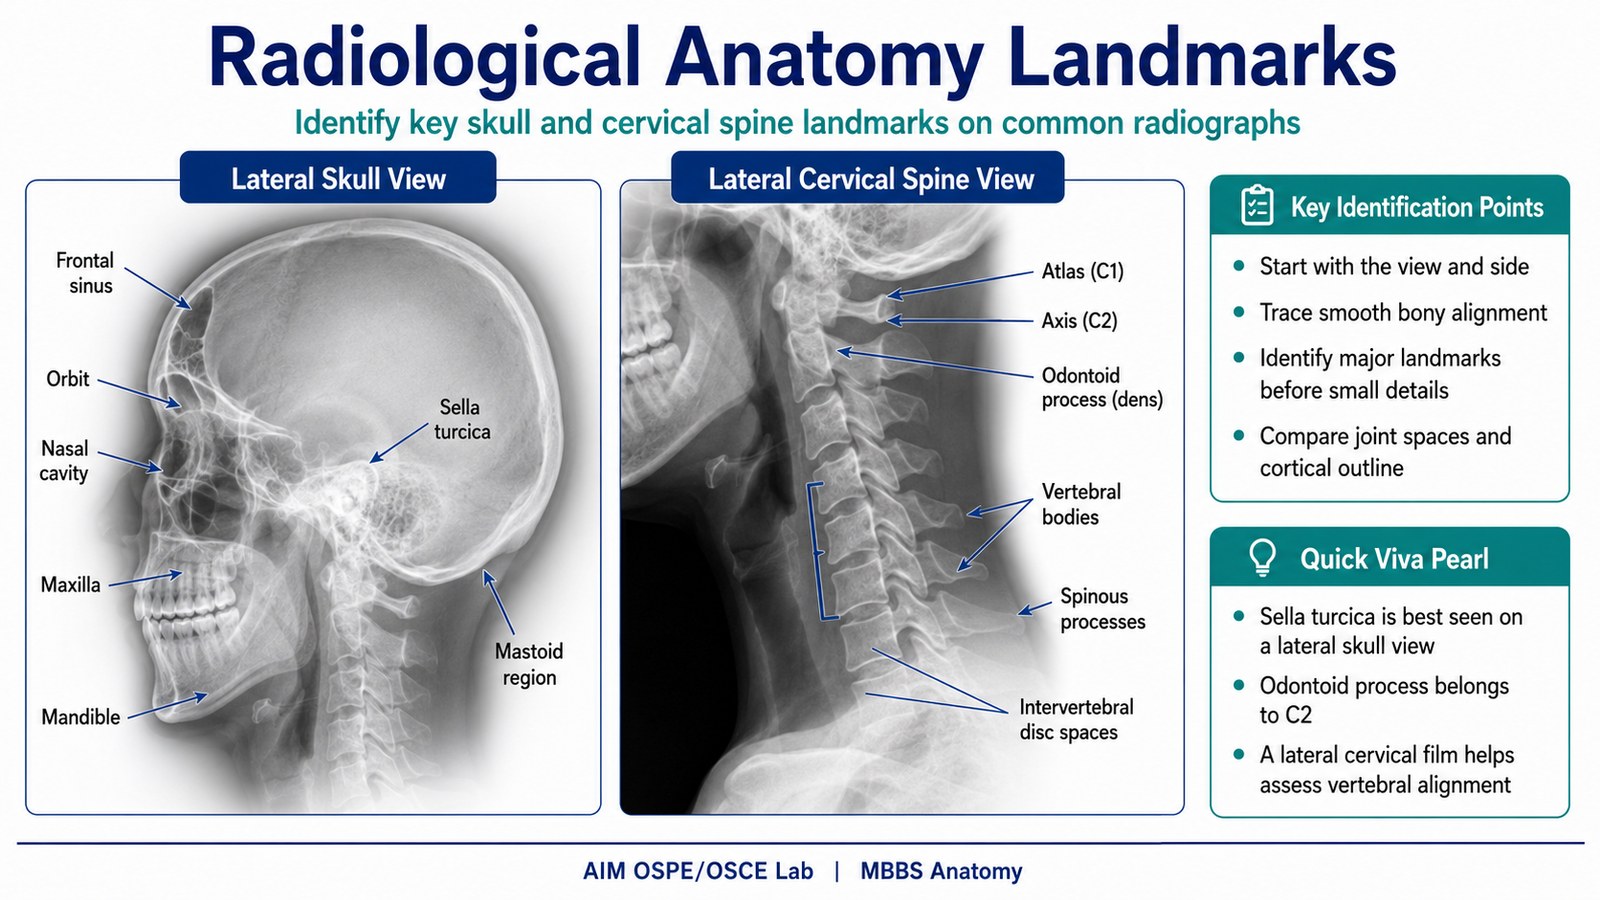
- Labeled or unlabeled X-rays/radiographic images
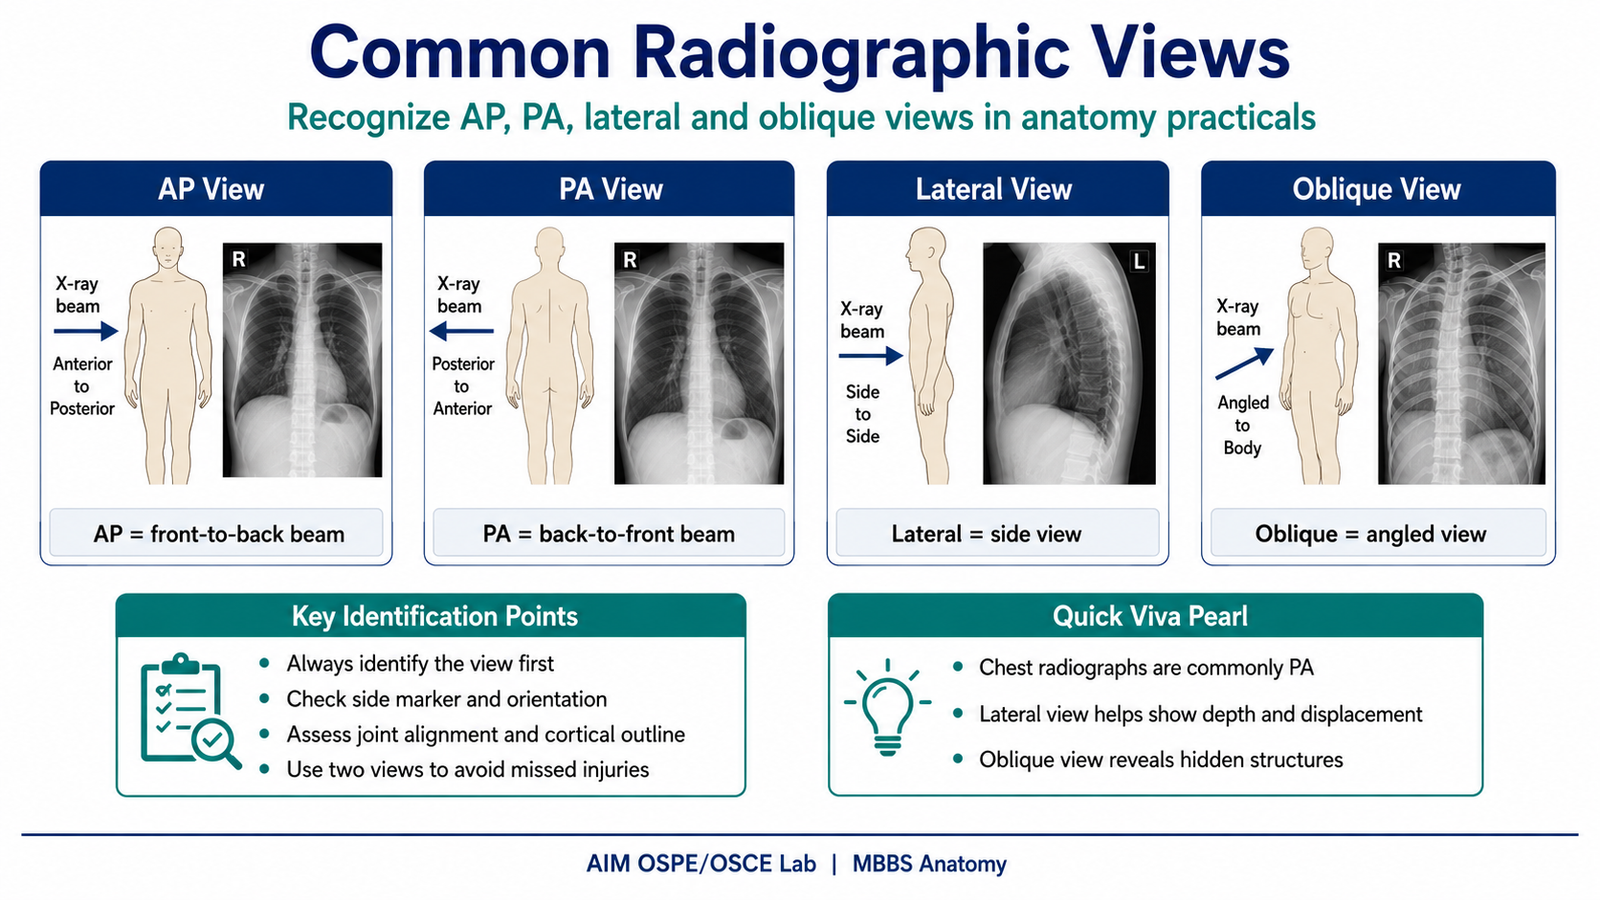
- AP view
- Lateral view
- Oblique view
- PA skull/chest view where applicable
- Pointer or probe
- Station answer sheet
- Pencil/pen
- LMS image of bone/radiograph for online attempt
Student Task / Procedure
- Observe the given dry bone carefully.
- Identify the named bone marking indicated by the pointer.
- State whether the marking is a process, tubercle, tuberosity, condyle, epicondyle, fossa, groove, notch, crest, spine, or foramen.
- Mention one structure attached to or passing through the identified landmark, where applicable.
- Observe the given radiograph.
- Identify the radiographic view shown, such as AP, lateral, PA, or oblique.
- Identify the anatomical landmark marked on the radiograph.
- State one clinical importance of the landmark or radiographic view.
- Answer the viva questions briefly and directly.
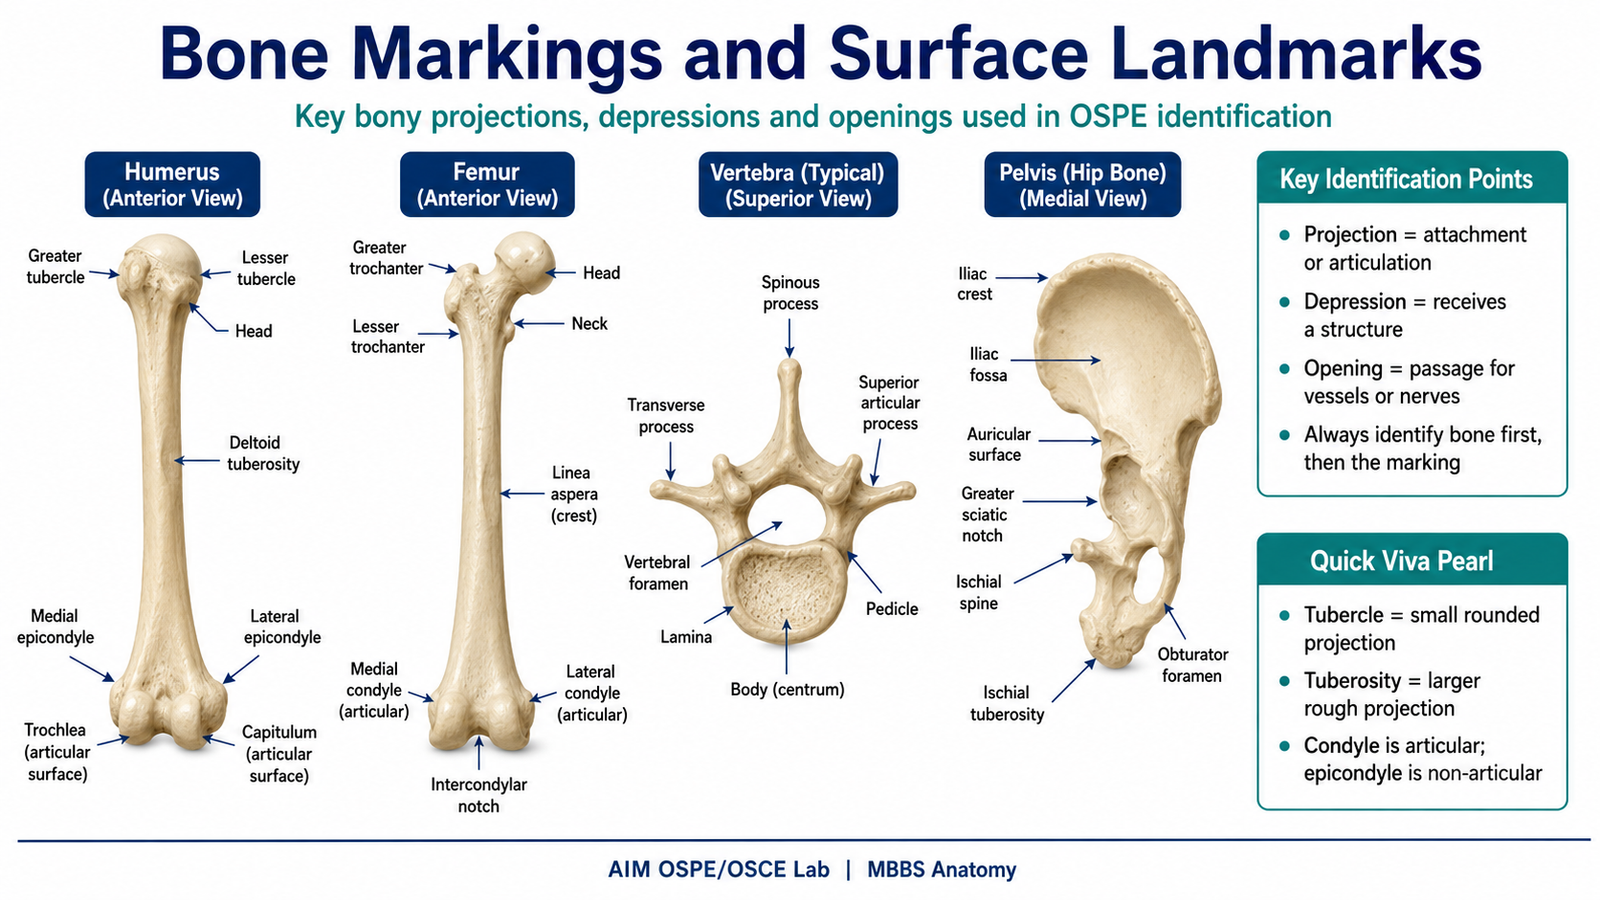
Observation / Identification Points
Students should be able to identify:
- Bone markings for muscle/ligament attachment
- Tuberosity
- Tubercle
- Crest
- Spine
- Line
- Process
- Articular landmarks
- Head
- Neck
- Condyle
- Epicondyle
- Trochlea
- Facet
- Depressions and passages
- Fossa
- Groove
- Notch
- Foramen
- Canal
- Common examples
- Greater and lesser tubercles of humerus
- Deltoid tuberosity
- Medial and lateral epicondyles
- Olecranon fossa
- Radial tuberosity
- Ulnar styloid process
- Greater trochanter of femur
- Lesser trochanter
- Medial and lateral condyles of femur
- Tibial tuberosity
- Medial malleolus
- Vertebral foramen
- Spinous process
- Transverse process
- Iliac crest
- Ischial tuberosity
- Acetabulum
- Obturator foramen
- Radiological anatomy points
- Correct side and orientation of the radiograph
- AP versus lateral view
- Visible joints above and below the bone
- Cortical outline of bone
- Joint space
- Epiphysis, metaphysis, and diaphysis in long bones
- Alignment of bones at joints
- Important landmarks on X-ray
Result / Interpretation
Correct identification of bone markings helps the student understand muscle attachment, ligament attachment, joint formation, neurovascular passage, and fracture-related anatomy.
Radiological anatomy allows recognition of normal bony landmarks on X-ray. This is important because common fractures, dislocations, joint abnormalities, and deformities are diagnosed by comparing normal anatomical landmarks with abnormal radiographic findings.
Common radiographic views are interpreted as follows:
- AP view: X-ray beam passes from anterior to posterior; commonly used for limbs, pelvis, and abdomen.
- PA view: X-ray beam passes from posterior to anterior; commonly used for chest and skull views.
- Lateral view: Side view; useful for depth, displacement, vertebral alignment, and fracture confirmation.
- Oblique view: Angled view; useful for visualizing structures hidden in AP or lateral views.
Clinical significance:
- Tuberosities and crests indicate sites of muscle attachment.
- Foramina and grooves indicate passage of nerves and vessels.
- Condyles and facets form joints.
- Radiographs help detect fractures, dislocations, joint space narrowing, and abnormal alignment.
Common Student Mistakes
- Confusing tubercle with tuberosity.
- Identifying the bone correctly but naming the wrong side.
- Confusing condyle with epicondyle.
- Forgetting to mention the structure attached to or passing through a landmark.
- Misidentifying AP and lateral radiographic views.
- Ignoring the joint above and below the bone on X-ray.
- Looking only at the fracture area and not checking overall alignment.
- Confusing normal epiphyseal line with fracture line.
- Using vague answers such as “projection” instead of the exact anatomical term.
- Failing to relate bone markings to clinical significance.
AIM Feedback
To improve in this station, first identify the bone and its side before naming any marking. Then classify the marking according to its function: attachment, articulation, depression, or passage. On radiographs, always start by identifying the view, side, bone outline, joint alignment, and major landmarks. Good OSPE performance depends on accurate identification plus one short clinical or functional explanation.
Most Important Viva Questions for This Topic
- What is a bone marking?
A bone marking is a surface feature of bone such as a projection, depression, opening, or articular area. - What is the difference between a tubercle and a tuberosity?
A tubercle is a small rounded projection, while a tuberosity is a larger rough projection for muscle or ligament attachment. - What is a condyle?
A condyle is a rounded articular surface that forms part of a joint. - What is an epicondyle?
An epicondyle is a projection above or near a condyle, usually for muscle or ligament attachment. - Give one example of a tuberosity and its attachment.
Tibial tuberosity gives attachment to the patellar ligament. - What is the clinical importance of the surgical neck of humerus?
It is a common fracture site and is related to the axillary nerve. - Which nerve is related to the radial groove of humerus?
The radial nerve passes in the radial groove. - What passes through a foramen?
Usually nerves, blood vessels, or other structures pass through a foramen. - What is the difference between AP and PA radiographic views?
In AP view, the beam passes from anterior to posterior. In PA view, the beam passes from posterior to anterior. - Why are two radiographic views usually taken?
Two views help confirm the location, direction, and displacement of fractures or dislocations. - What should be checked first when interpreting a limb X-ray?
Check patient orientation, side marker, radiographic view, bone outline, joint alignment, and visible landmarks. - Why is knowledge of normal bone landmarks important in radiology?
It helps differentiate normal anatomy from fractures, dislocations, deformities, and pathological changes.
🖼️ Visual / Image Support
🧩 Concept Map / Interpretation Support