🩺 Station 4 — Sterilization and Autoclaving
AIM OSPE/OSCE Lab — Practical Station | KMU Style | MBBS Practical + Viva
📋 Complete OSPE Station Content
OSPE Station Name
Station 4 — Sterilization and Autoclaving
Learning Target
By the end of this station, the student should be able to:
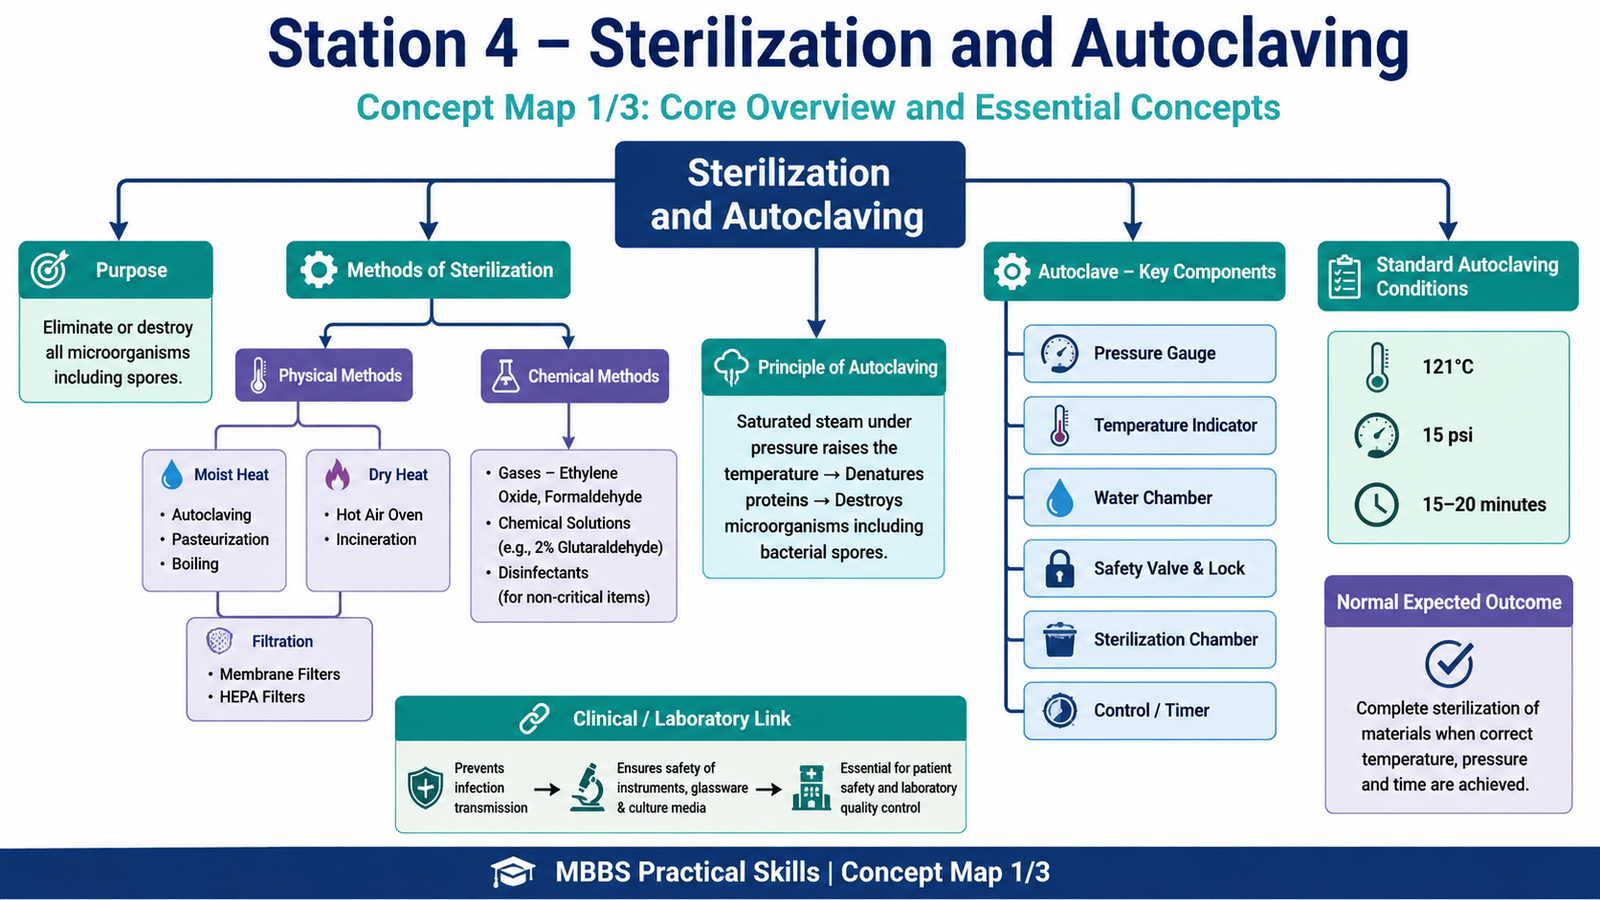
- Explain the basic principle of sterilization and common sterilization methods used in the laboratory.
- Observe and describe the correct autoclaving process for sterilization of laboratory materials.
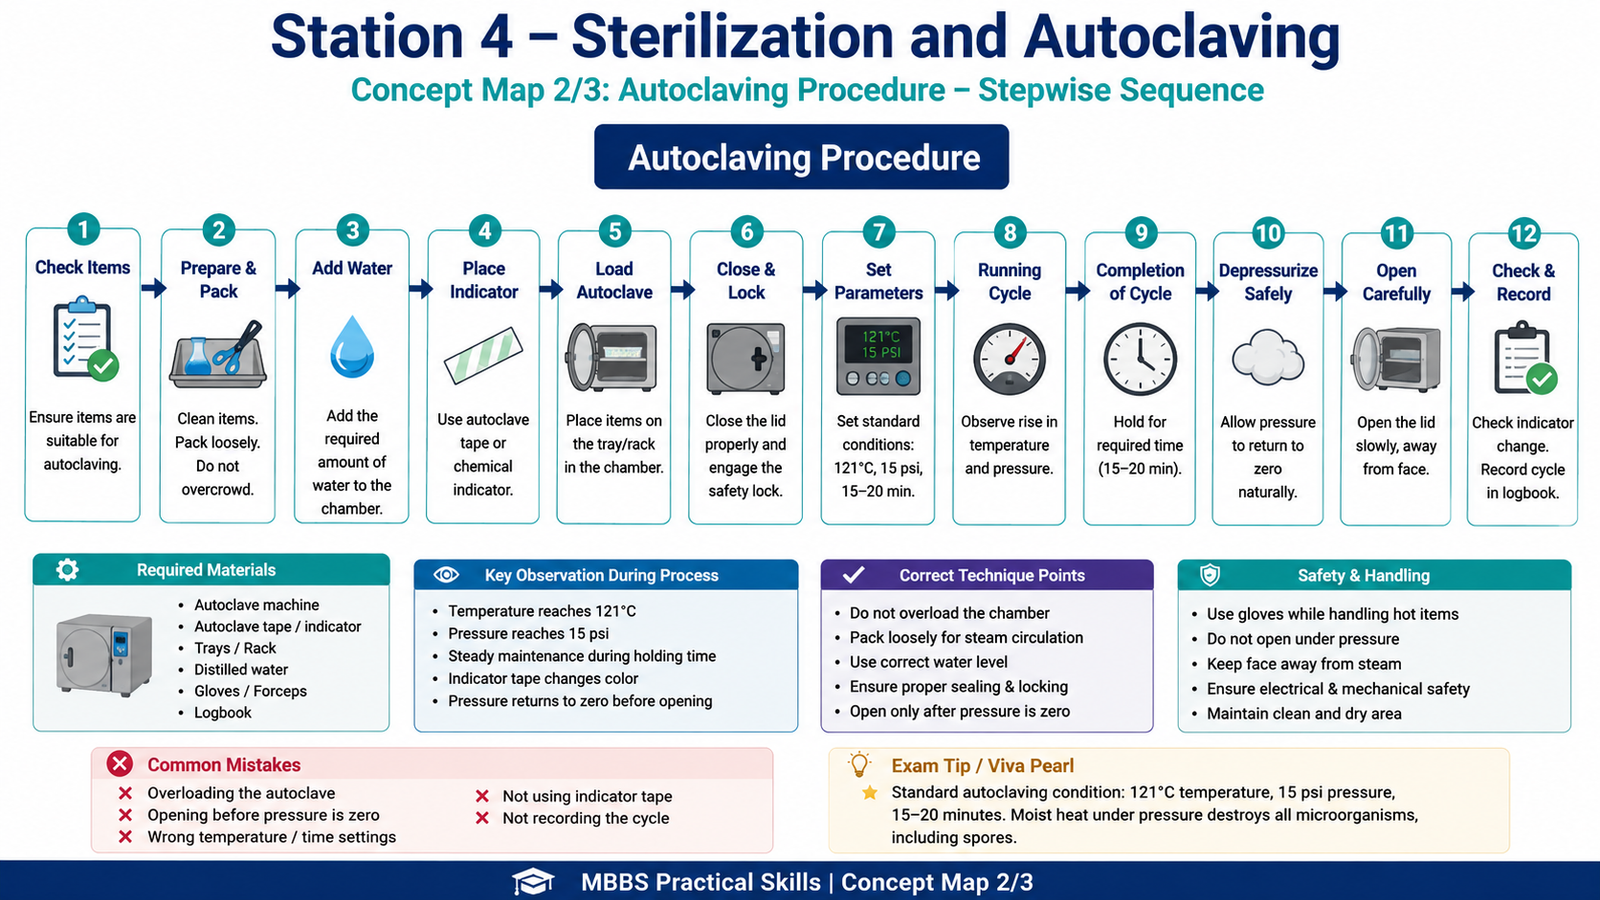
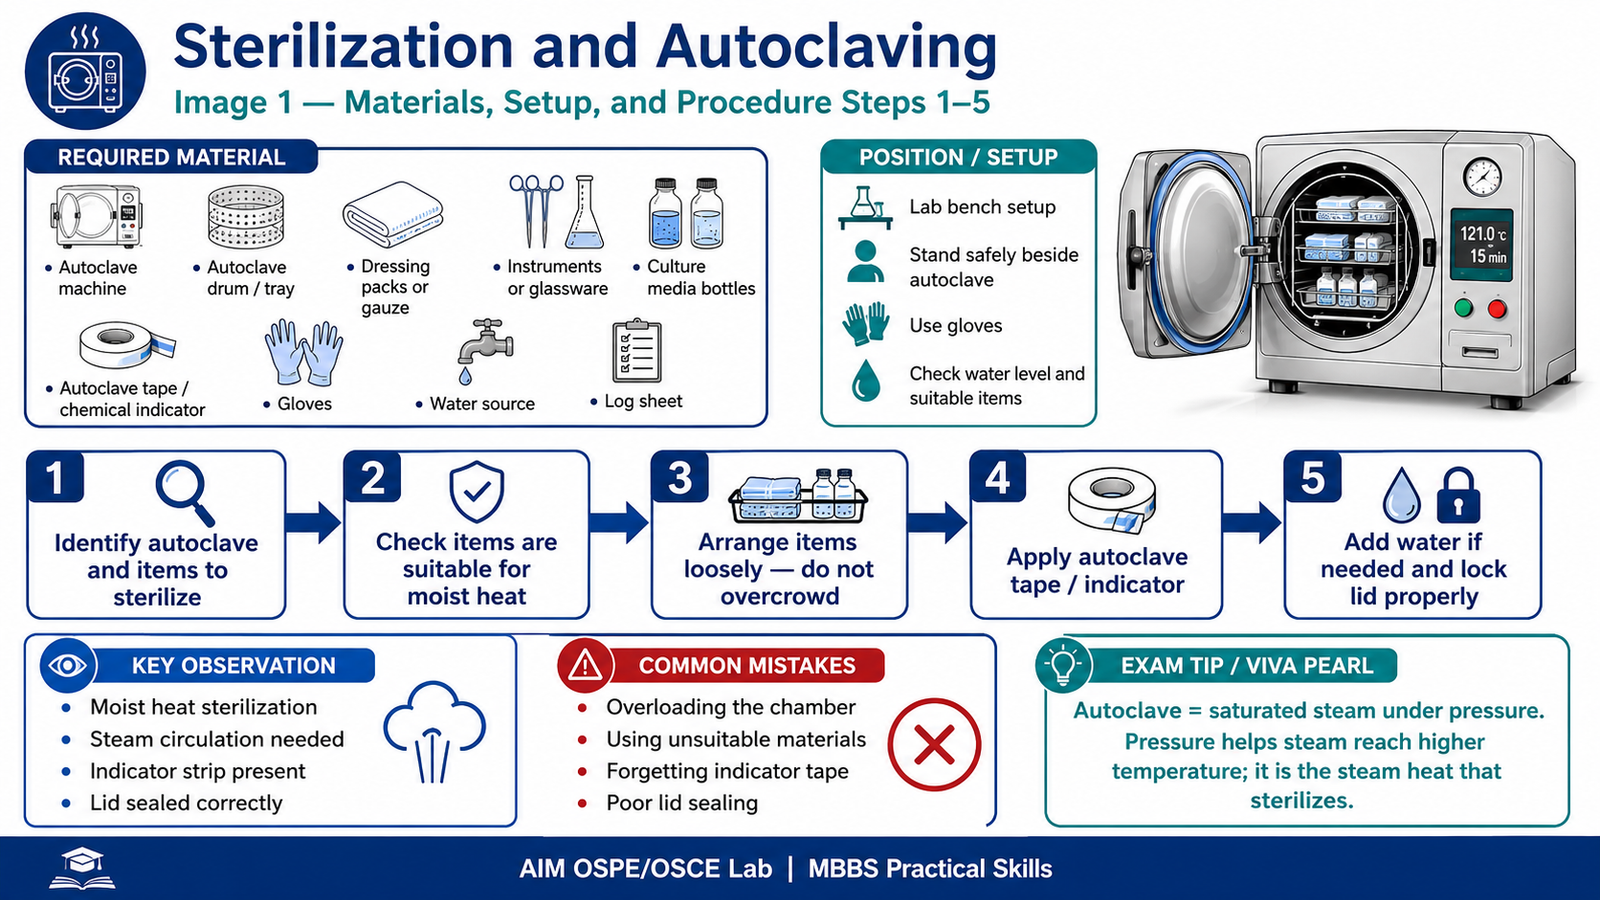
Required Material
- Autoclave machine
- Autoclave drum / sterilization container
- Cotton plugs / gauze / dressing material
- Glassware / culture media bottles / instruments
- Autoclave tape / chemical indicator strip
- Gloves
- Forceps
- Waste container
- Labeling marker
- Logbook or autoclave record sheet
Student Task / Procedure
- Identify the autoclave and the material to be sterilized.
- Check that the material is suitable for autoclaving.
- Place items properly in the autoclave drum or tray without overcrowding.
- Apply autoclave tape or place a chemical indicator strip.
- Add the required amount of water to the autoclave if needed.
- Close and lock the autoclave lid properly.
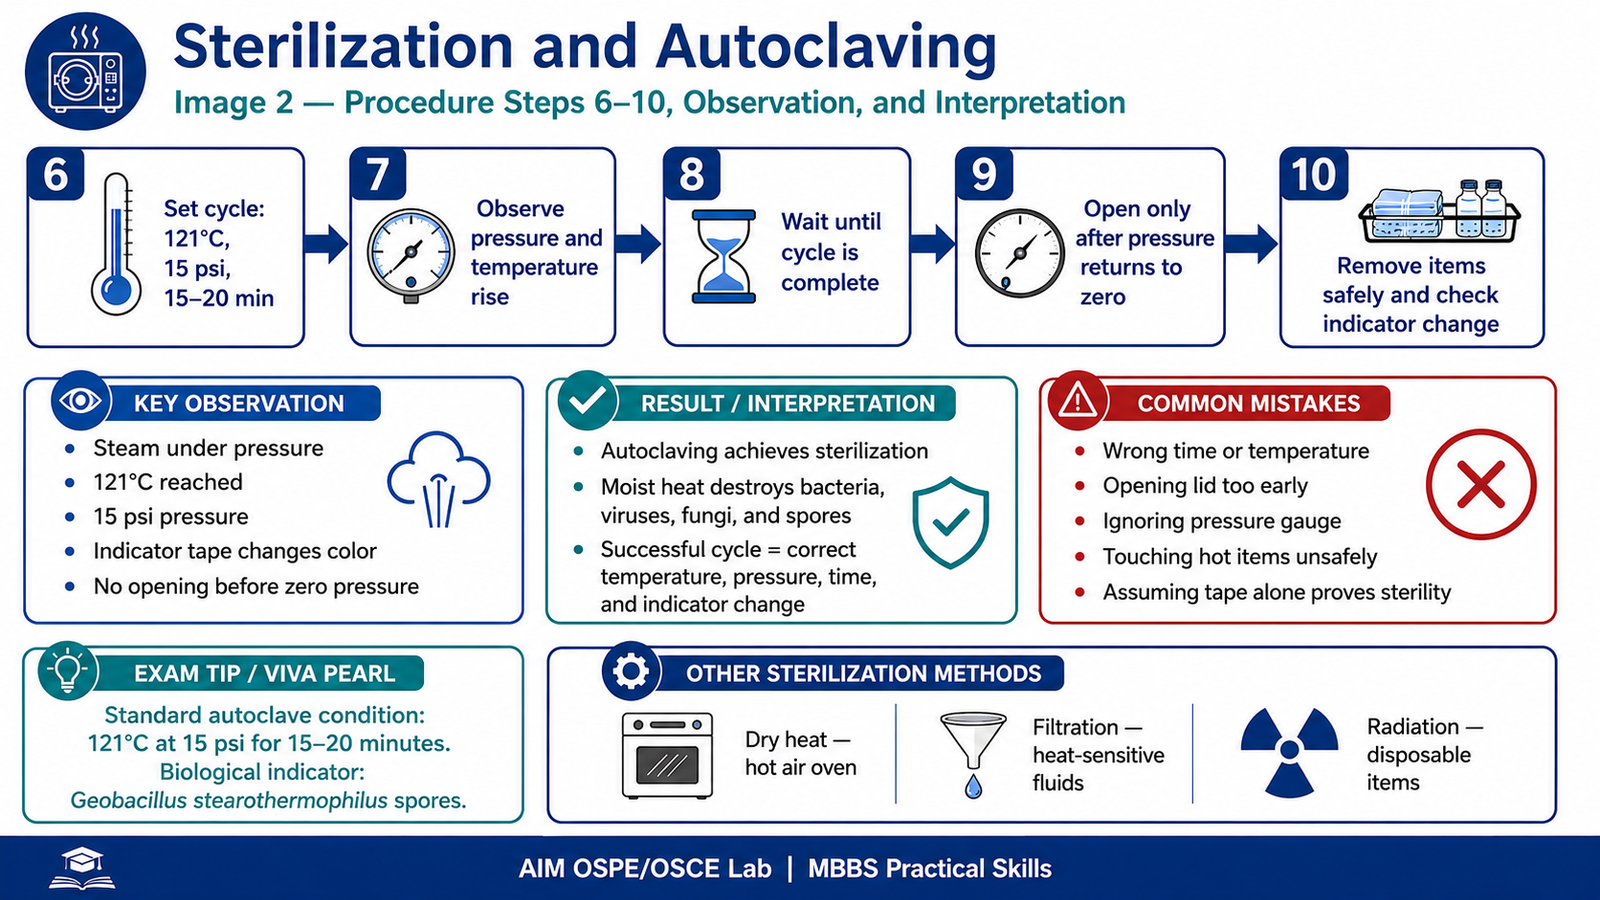
- Set the standard sterilization conditions: 121°C temperature, 15 psi pressure, for 15–20 minutes.
- Observe the rise of temperature and pressure.
- After completion, allow pressure to return to zero before opening.
- Open the autoclave carefully, away from the face, and remove sterilized material safely.
- Check the autoclave tape or indicator for evidence of sterilization.
- Record the cycle in the autoclave logbook.
Observation / Identification Points
The student should observe or identify:
- Autoclave as a moist heat sterilization device.
- Correct arrangement of materials inside the autoclave.
- Autoclave tape or chemical indicator change.
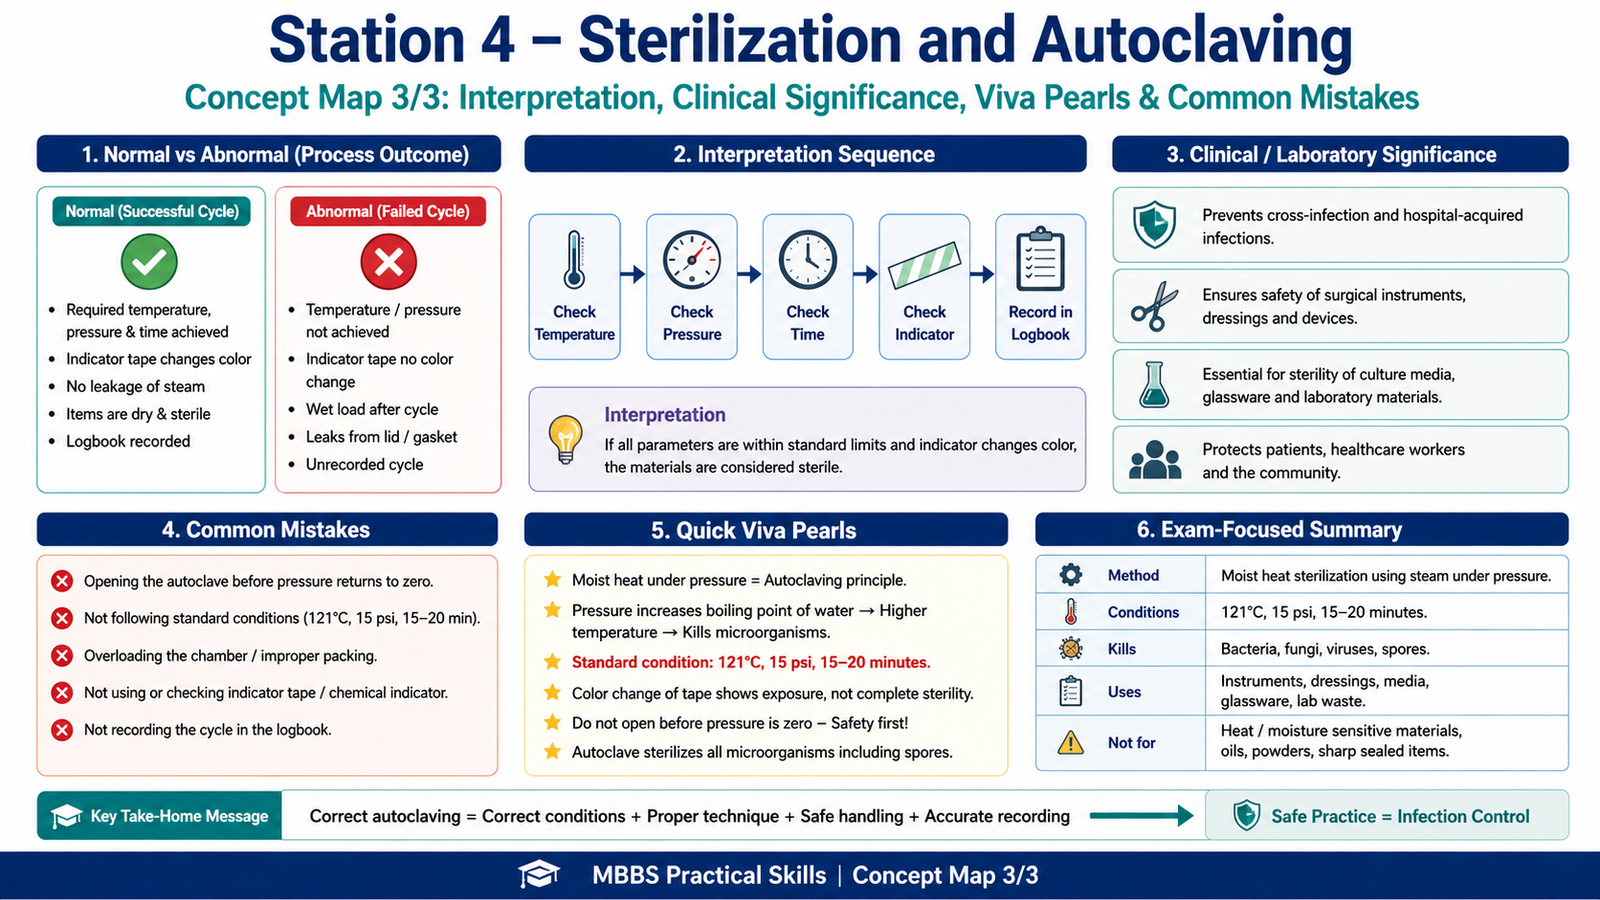
- Standard autoclaving conditions: 121°C, 15 psi, 15–20 minutes.
- Proper locking and sealing of the lid.
- Pressure gauge and temperature indicator.
- Safe opening only after pressure becomes zero.
- Avoidance of overcrowding.
- Difference between sterilization and disinfection.
- Materials suitable and unsuitable for autoclaving.
Result / Interpretation
Autoclaving sterilizes materials by using saturated steam under pressure. Moist heat denatures microbial proteins and destroys bacteria, fungi, viruses, and bacterial spores.
A successful autoclave cycle is indicated by:
- Correct temperature and pressure reached.
- Completion of required holding time.
- Change in autoclave tape or chemical indicator.
- Properly dried and safely handled sterilized materials.
Clinical significance: Autoclaving prevents infection transmission by ensuring that instruments, dressings, culture media, and laboratory materials are free from viable microorganisms.
Common Student Mistakes
- Opening the autoclave before pressure returns to zero.
- Forgetting the standard conditions: 121°C, 15 psi, 15–20 minutes.
- Overloading the autoclave, preventing proper steam penetration.
- Confusing sterilization with disinfection.
- Not using or checking autoclave tape / indicator properly.
AIM Feedback
Autoclaving is one of the most important practical sterilization methods in medical laboratories. Remember that the key principle is moist heat under pressure, not dry heat. For KMU viva, focus on the standard conditions, mechanism of microbial killing, safety precautions, and the difference between sterilization and disinfection. Always mention that pressure itself does not kill organisms directly; it allows steam to reach a higher temperature.
Most Important Viva Questions for This Topic
1. What is sterilization?
Sterilization is the complete destruction or removal of all forms of microbial life, including bacterial spores.
2. What is autoclaving?
Autoclaving is a method of sterilization using saturated steam under pressure.
3. What are the standard conditions for autoclaving?
121°C temperature, 15 psi pressure, for 15–20 minutes.
4. What is the principle of autoclaving?
Steam under pressure produces moist heat, which coagulates and denatures microbial proteins.
5. Does pressure itself kill microorganisms?
No. Pressure increases the boiling point of water, allowing steam to reach a higher temperature.
6. Which microorganisms are destroyed by autoclaving?
Bacteria, fungi, viruses, and bacterial spores are destroyed if the cycle is proper.
7. Why is moist heat more effective than dry heat?
Moist heat penetrates materials better and denatures proteins more efficiently than dry heat.
8. What is the difference between sterilization and disinfection?
Sterilization destroys all microorganisms including spores, while disinfection reduces or destroys many pathogens but may not kill spores.
9. What materials can be sterilized by autoclaving?
Surgical instruments, dressings, glassware, culture media, and autoclavable laboratory waste.
10. What materials should not be autoclaved?
Heat-sensitive plastics, powders, oils, sharp sealed containers, and materials damaged by moisture.
🖼️ Visual / Image Support
🧩 Concept Map / Interpretation Support