🩺 Station 6 — Carbohydrate Identification Tests
AIM OSPE/OSCE Lab — Practical Station | KMU Style | MBBS Practical + Viva
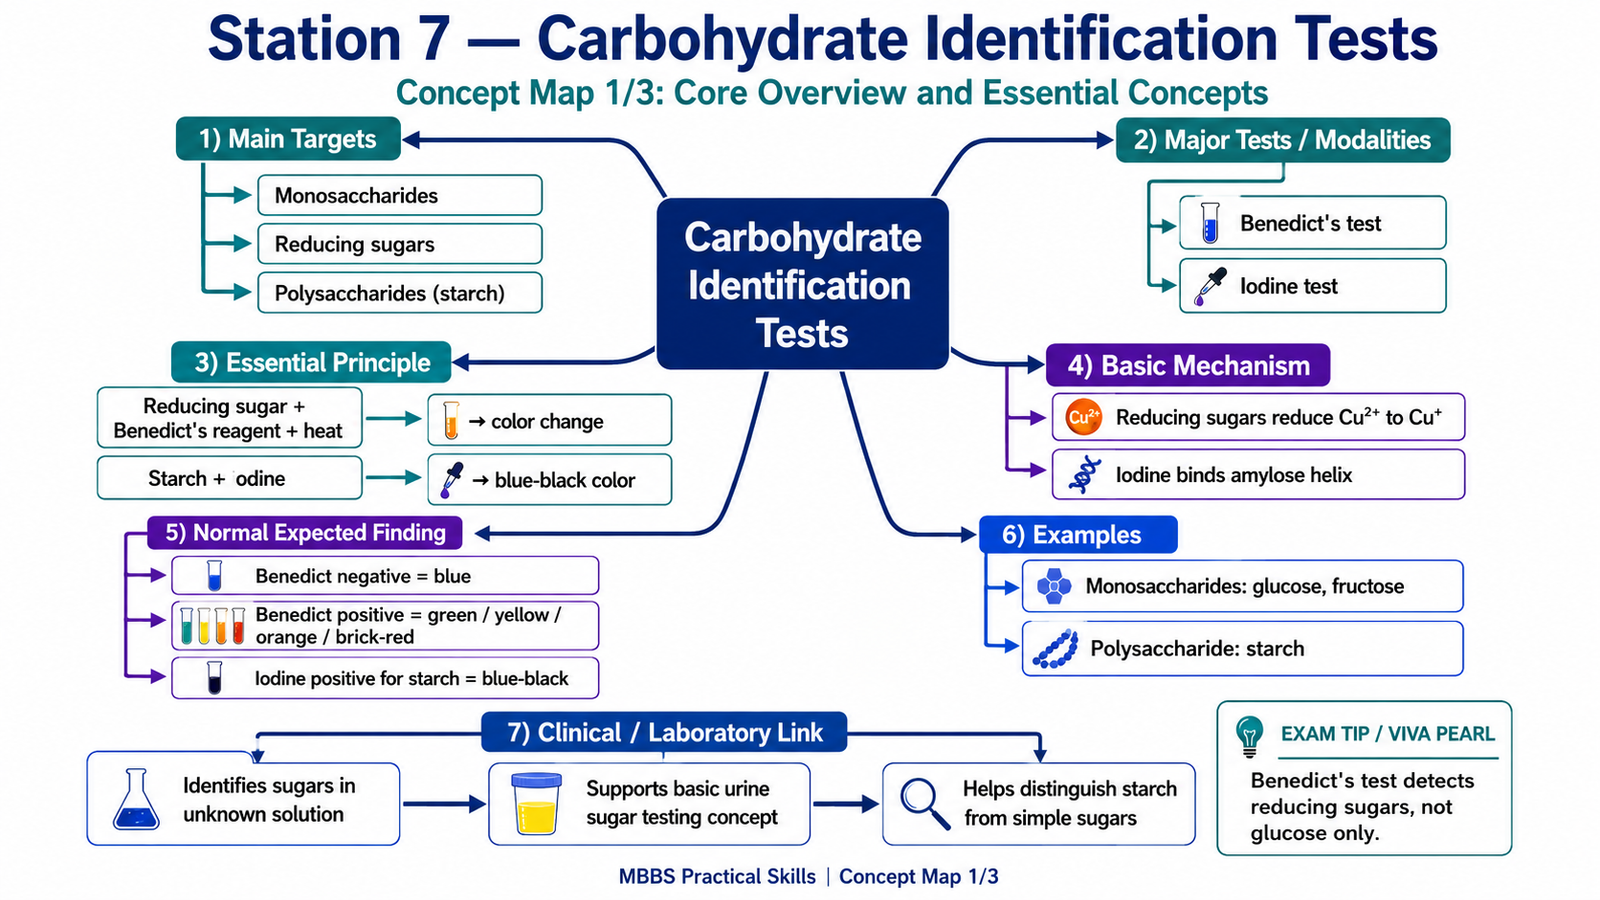
📋 Complete OSPE Station Content
OSPE Station Name
Station 7 — Carbohydrate Identification Tests
Learning Target
By the end of this station, the student should be able to:
- Perform Benedict’s test to identify reducing sugars in a given solution.
- Identify polysaccharides such as starch using iodine test and interpret carbohydrate test results correctly.
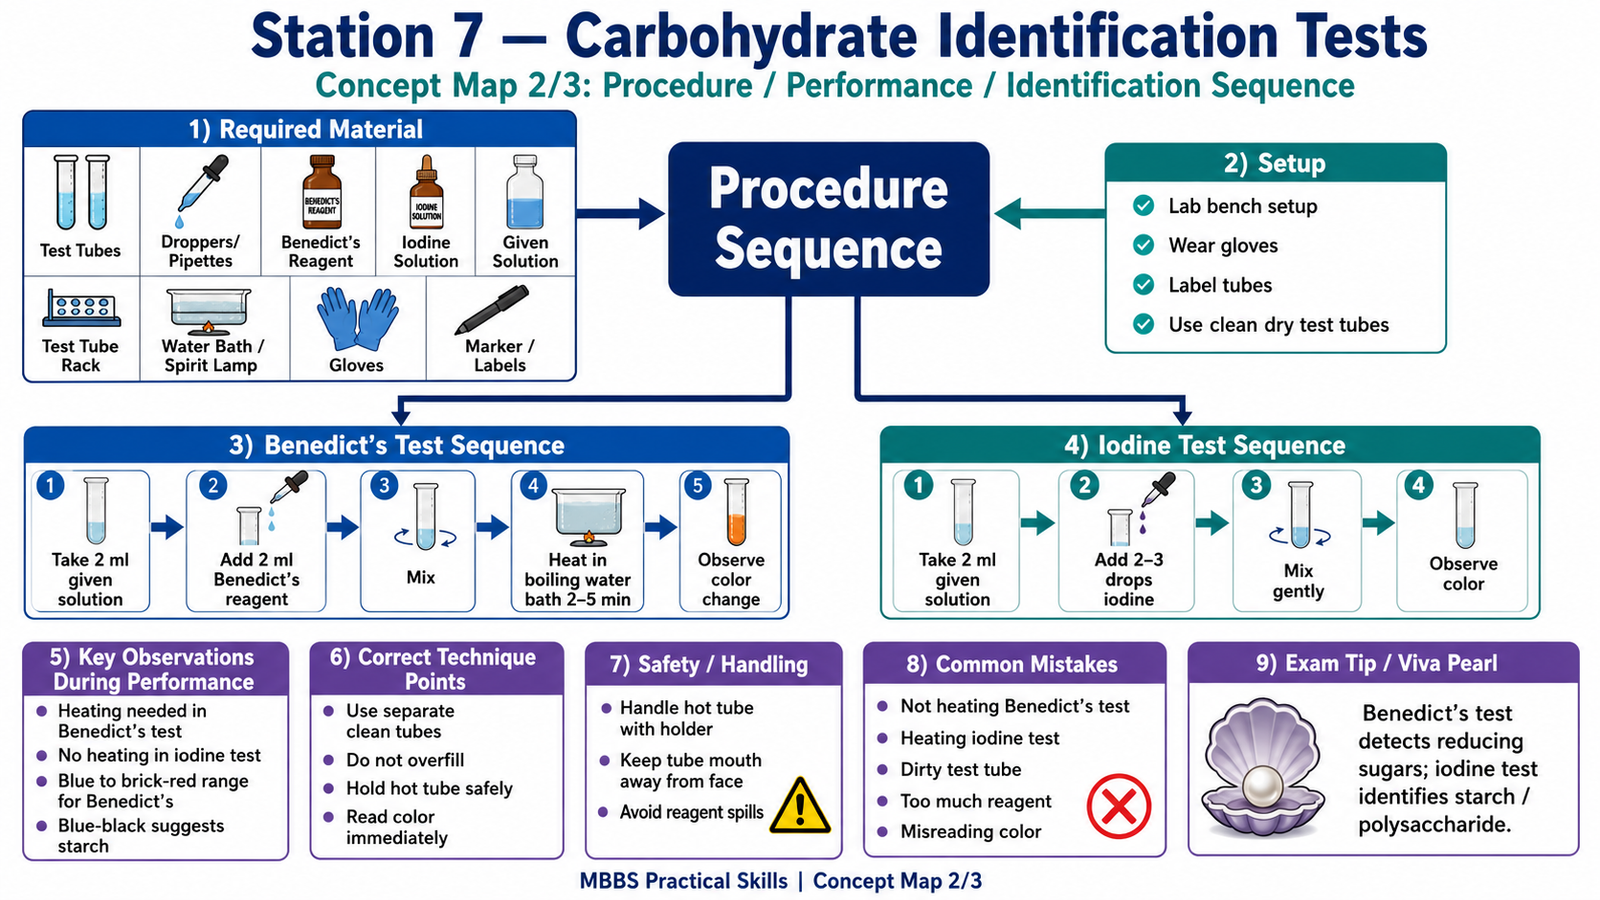
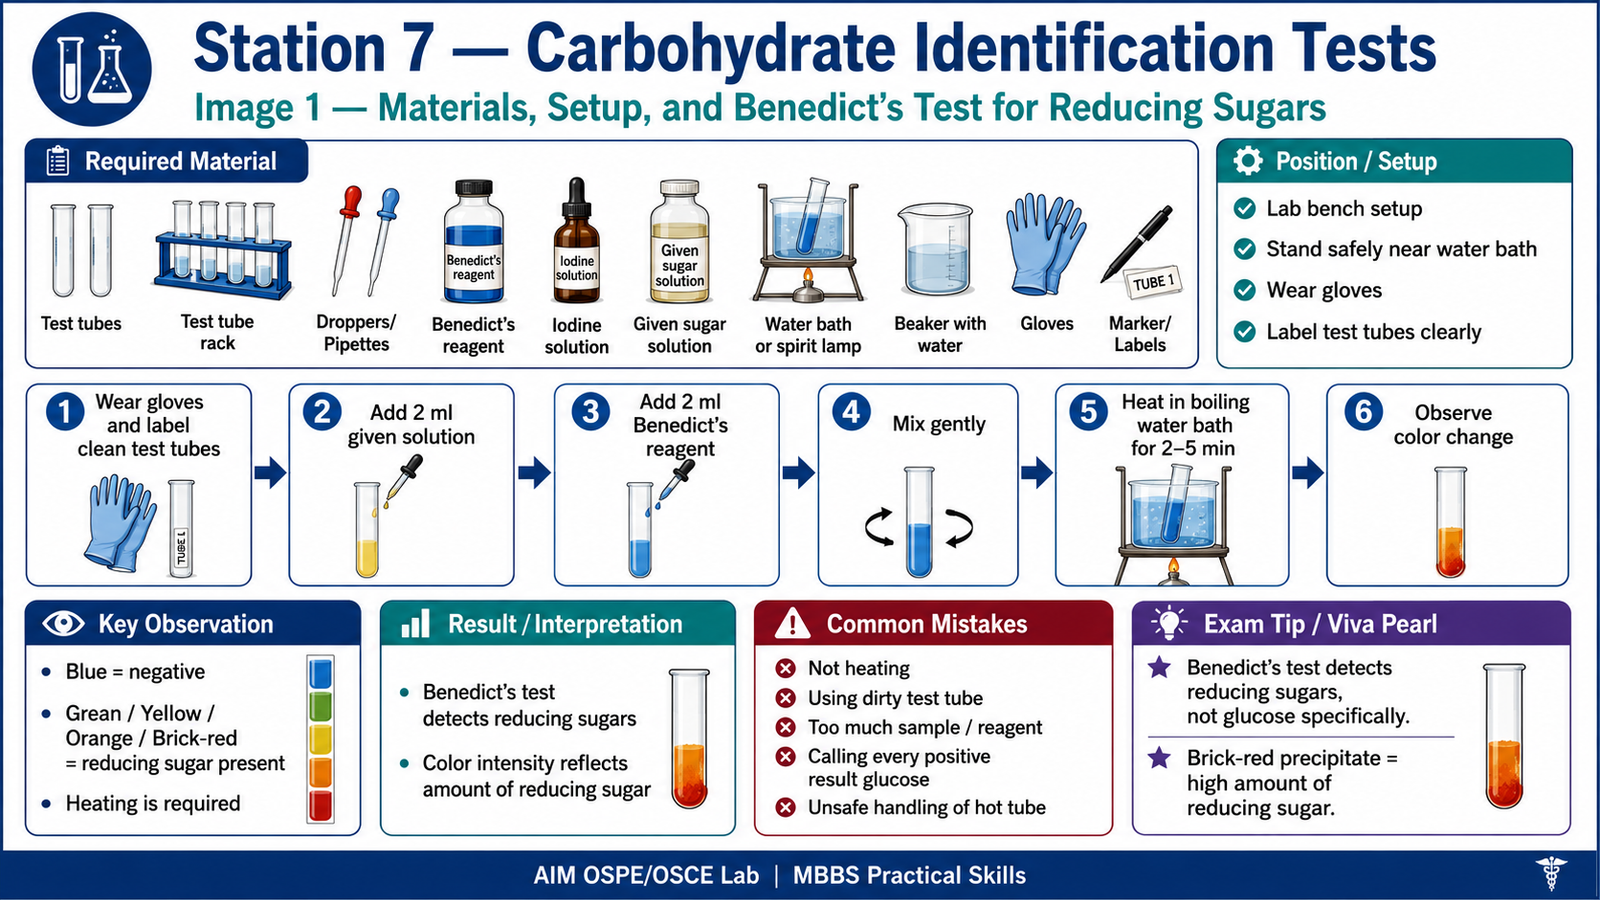
Required Material
- Test tubes
- Test tube rack
- Test tube holder
- Droppers / pipettes
- Given carbohydrate solution
- Benedict’s reagent
- Iodine solution
- Water bath / spirit lamp
- Beaker with water
- Gloves
- Marker for labeling
- Waste container
Student Task / Procedure
- Wear gloves and arrange the test tubes in a rack.
- Label the test tubes properly as Test Solution, Benedict’s Test, and Iodine Test if required.
- Take about 2 ml of the given carbohydrate solution in a clean test tube.
Benedict’s Test for Reducing Sugars
- Add about 2 ml Benedict’s reagent to the test solution.
- Mix gently.
- Heat the test tube in a boiling water bath for 2–5 minutes.
- Observe any color change.
- Record the result as blue, green, yellow, orange, or brick-red.
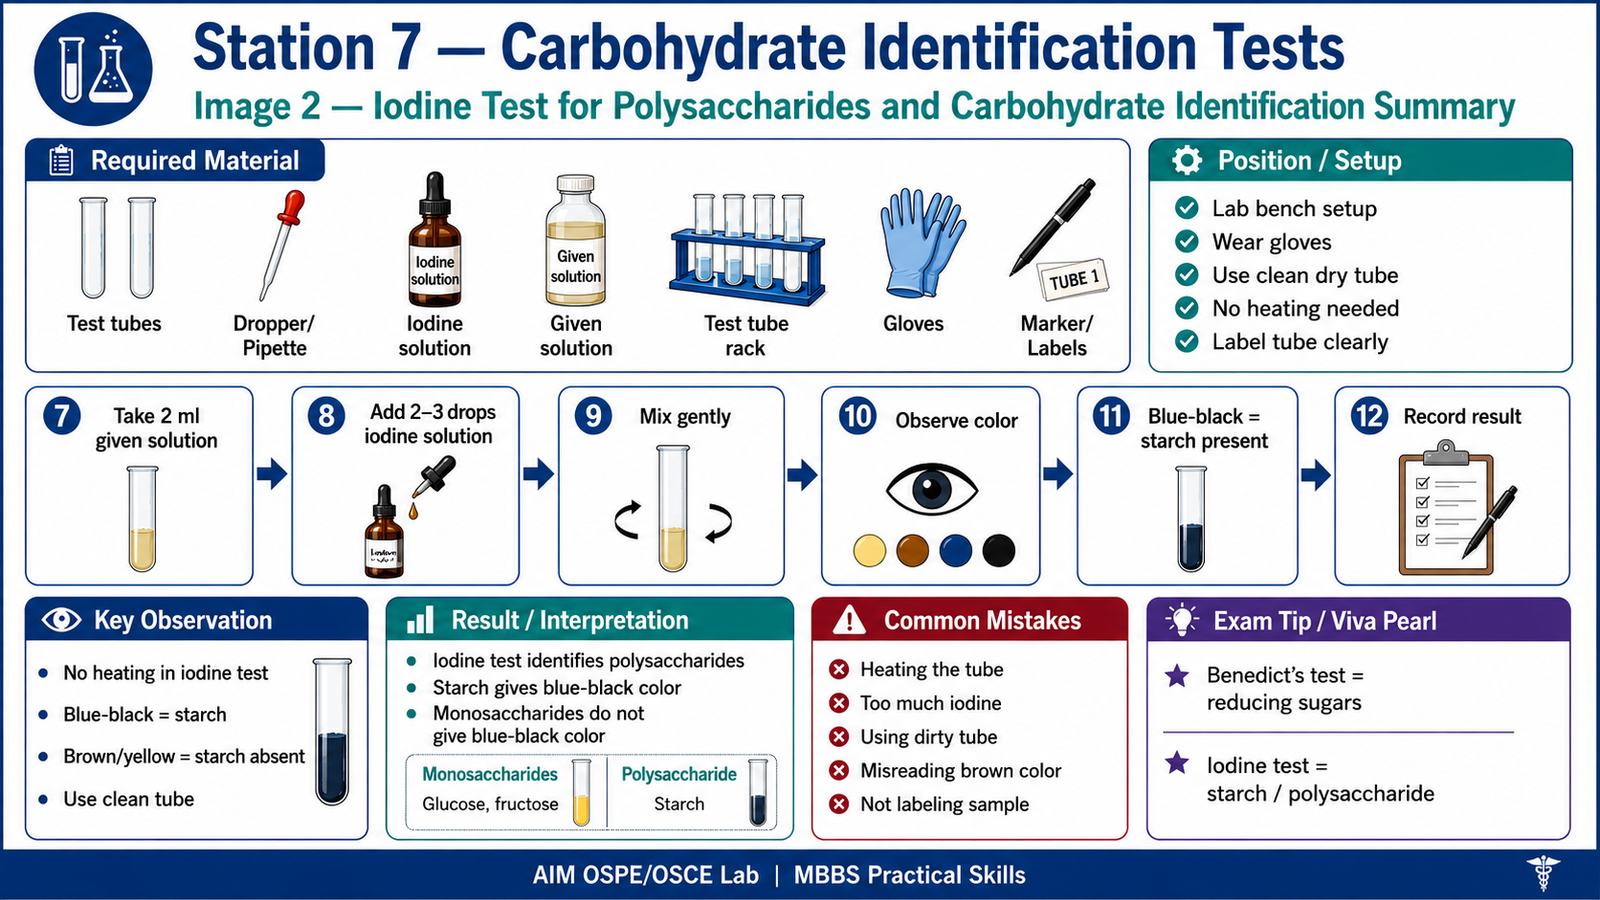
Iodine Test for Polysaccharides
- Take 2 ml of the given solution in another clean test tube.
- Add 2–3 drops of iodine solution.
- Mix gently without heating.
- Observe the color change.
- Record whether a blue-black color appears.
Observation / Identification Points
The student should observe or identify:
- Correct use of clean, labeled test tubes.
- Addition of Benedict’s reagent before heating.
- Heating Benedict’s test in a water bath.
- Color change in Benedict’s test.
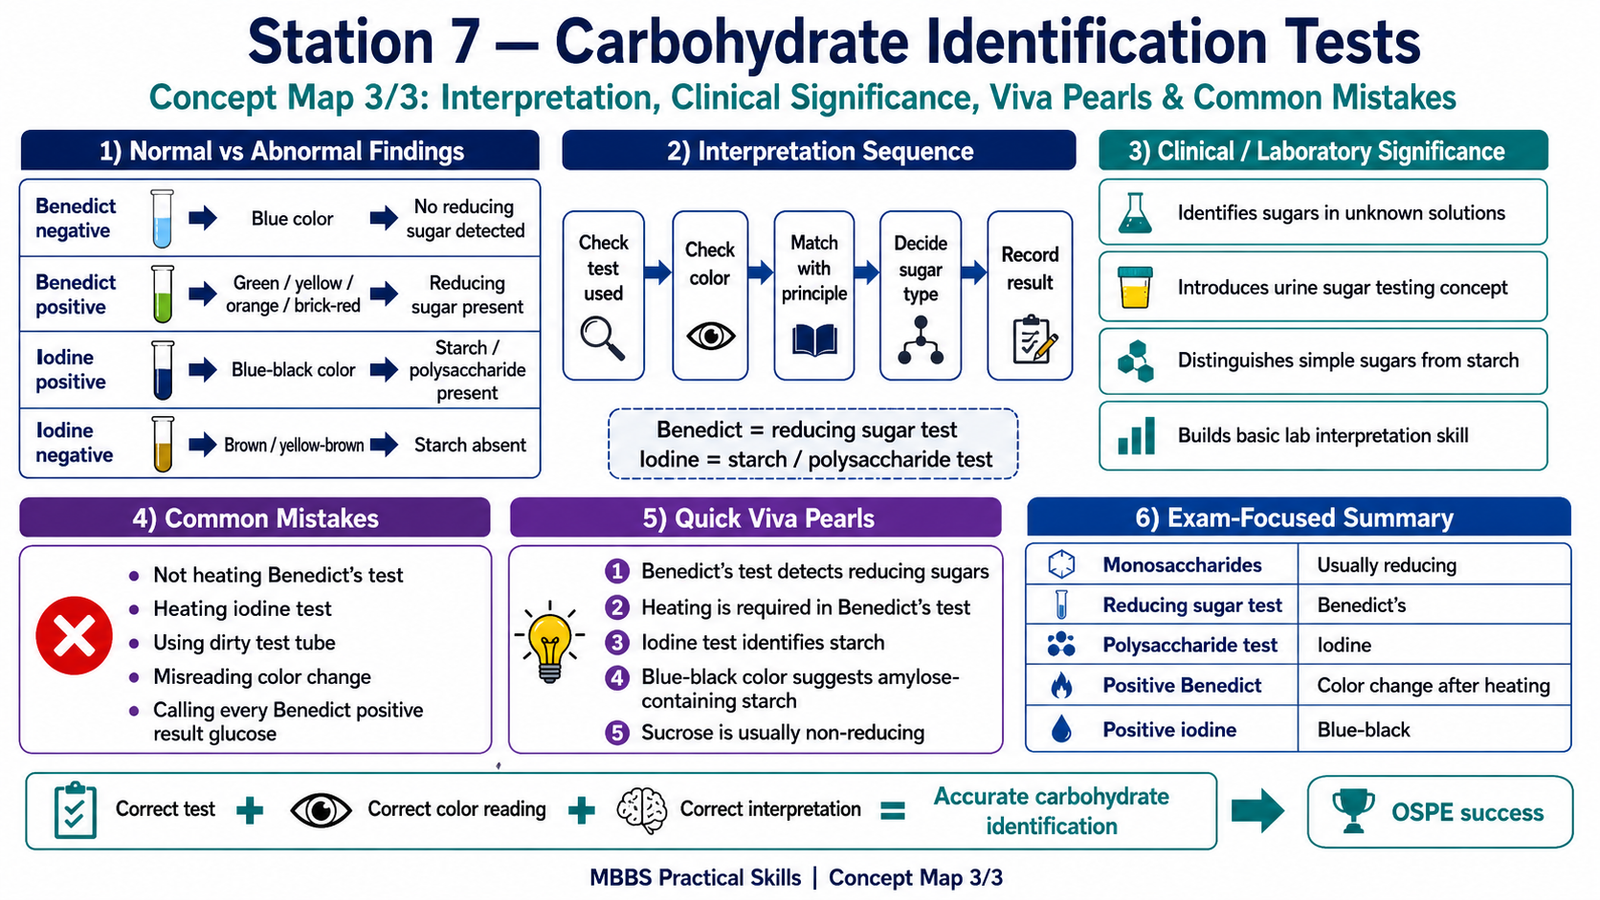
- Blue color means negative Benedict’s test.
- Green/yellow/orange/brick-red means reducing sugar is present.
- Iodine test should be performed without heating.
- Blue-black color with iodine suggests starch / polysaccharide.
- No blue-black color means starch is absent.
- Proper handling of hot test tubes and reagents.
Result / Interpretation
Benedict’s Test:
Reducing sugars reduce cupric ions to cuprous oxide during heating.
- Blue: No reducing sugar
- Green: Trace amount of reducing sugar
- Yellow: Low amount
- Orange: Moderate amount
- Brick-red precipitate: High amount of reducing sugar
Examples of reducing sugars include glucose, fructose, lactose, and maltose.
Iodine Test:
Iodine gives a blue-black color with starch due to iodine trapping within the helical structure of amylose.
- Blue-black color: Starch / polysaccharide present
- No blue-black color: Starch absent
Clinical significance:
Carbohydrate identification tests help students understand the biochemical basis of sugar detection, including reducing sugar detection in urine and basic laboratory identification of carbohydrates.
Common Student Mistakes
- Heating iodine test unnecessarily.
- Forgetting to heat Benedict’s test.
- Using dirty or contaminated test tubes.
- Calling every Benedict-positive result “glucose” instead of “reducing sugar.”
- Holding the hot test tube mouth toward the face or another person.
AIM Feedback
In this station, focus on test principle + color change + correct interpretation. Benedict’s test does not identify glucose specifically; it detects reducing sugars. Iodine test is mainly used to identify starch, a polysaccharide. In KMU viva, the examiner commonly asks why heating is needed in Benedict’s test, why starch gives blue-black color with iodine, and why sucrose is usually Benedict-negative unless hydrolyzed.
Most Important Viva Questions for This Topic
1. What is the purpose of Benedict’s test?
Benedict’s test is used to detect reducing sugars.
2. What is a reducing sugar?
A reducing sugar is a carbohydrate that has a free aldehyde or ketone group capable of reducing copper ions.
3. Give examples of reducing sugars.
Glucose, fructose, lactose, maltose, and galactose are reducing sugars.
4. What is the principle of Benedict’s test?
Reducing sugars reduce cupric ions to cuprous oxide, producing a colored precipitate on heating.
5. What is the positive result of Benedict’s test?
A positive result shows green, yellow, orange, or brick-red color depending on the amount of reducing sugar.
6. What does brick-red precipitate indicate?
It indicates a high amount of reducing sugar.
7. Is sucrose Benedict-positive?
No. Sucrose is a non-reducing sugar because its reducing groups are involved in glycosidic bond formation.
8. Why is heating required in Benedict’s test?
Heating provides energy for the reduction reaction between reducing sugar and copper ions.
9. Which test is used to identify starch?
Iodine test is used to identify starch.
10. What is the positive result of iodine test?
A blue-black color indicates the presence of starch.
11. Why does starch give blue-black color with iodine?
Iodine fits into the helical structure of amylose in starch, producing a blue-black complex.
12. What is the difference between monosaccharides and polysaccharides?
Monosaccharides are single sugar units, while polysaccharides are long chains of many monosaccharide units.
🖼️ Visual / Image Support
🧩 Concept Map / Interpretation Support