🩺 Station 5 — Capillary Blood Sampling and Blood Smear
AIM OSPE/OSCE Lab — Practical Station | KMU Style | MBBS Practical + Viva
📋 Complete OSPE Station Content
OSPE Station Name
Station 5 — Capillary Blood Sampling and Blood Smear
Learning Target
By the end of this station, the student should be able to:
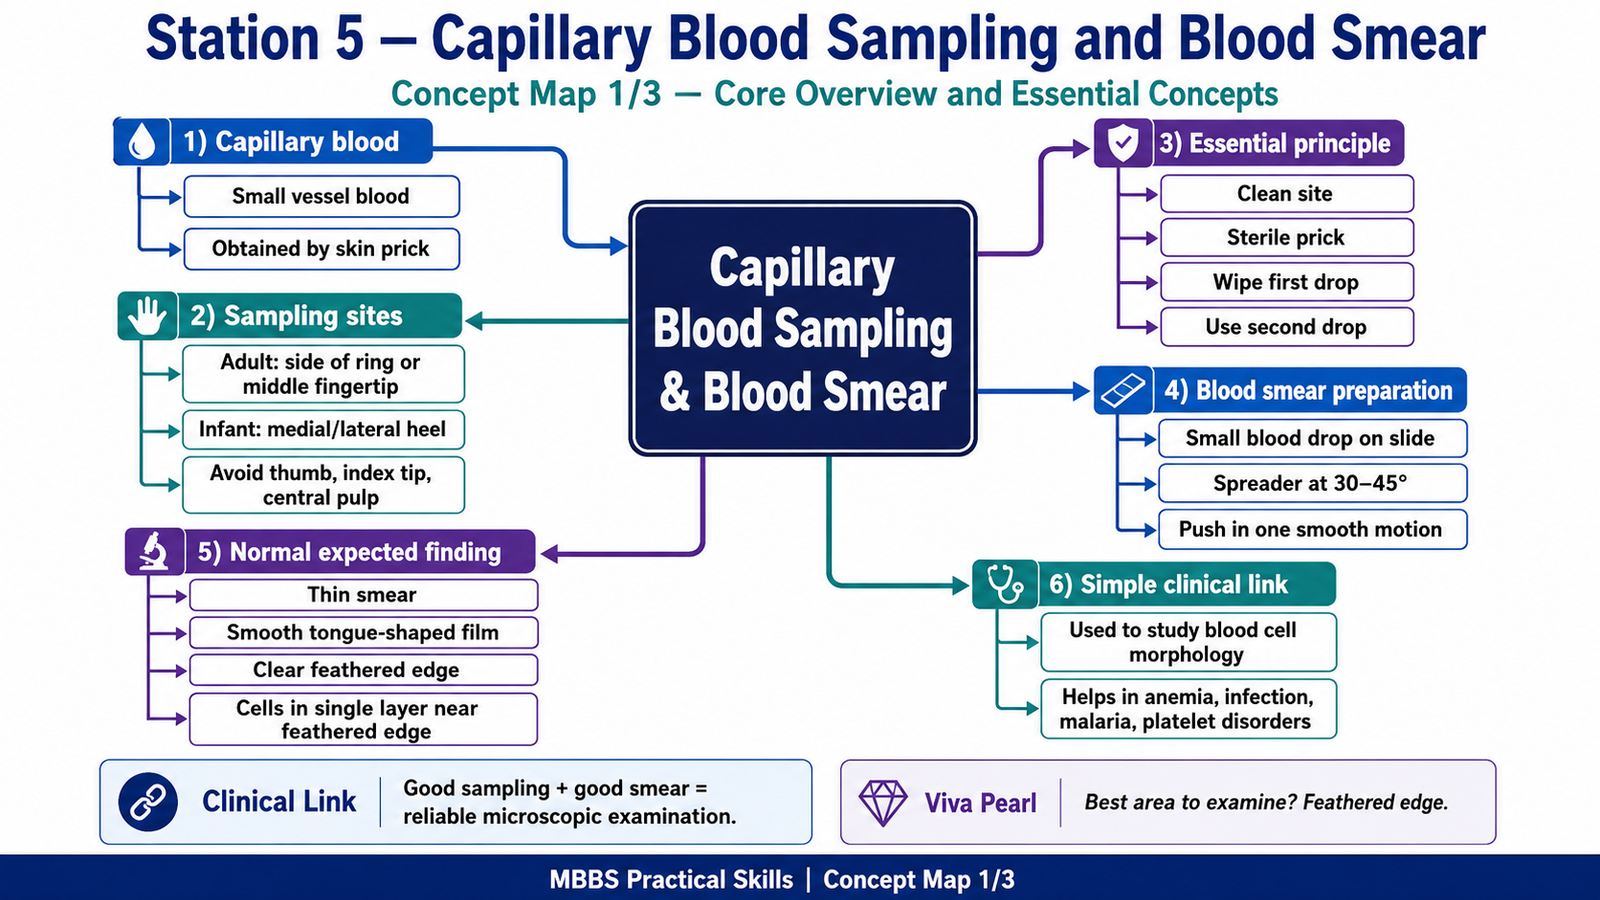
- Obtain capillary blood safely using the prick method from an appropriate sampling site.
- Prepare a thin peripheral blood smear suitable for microscopic examination.
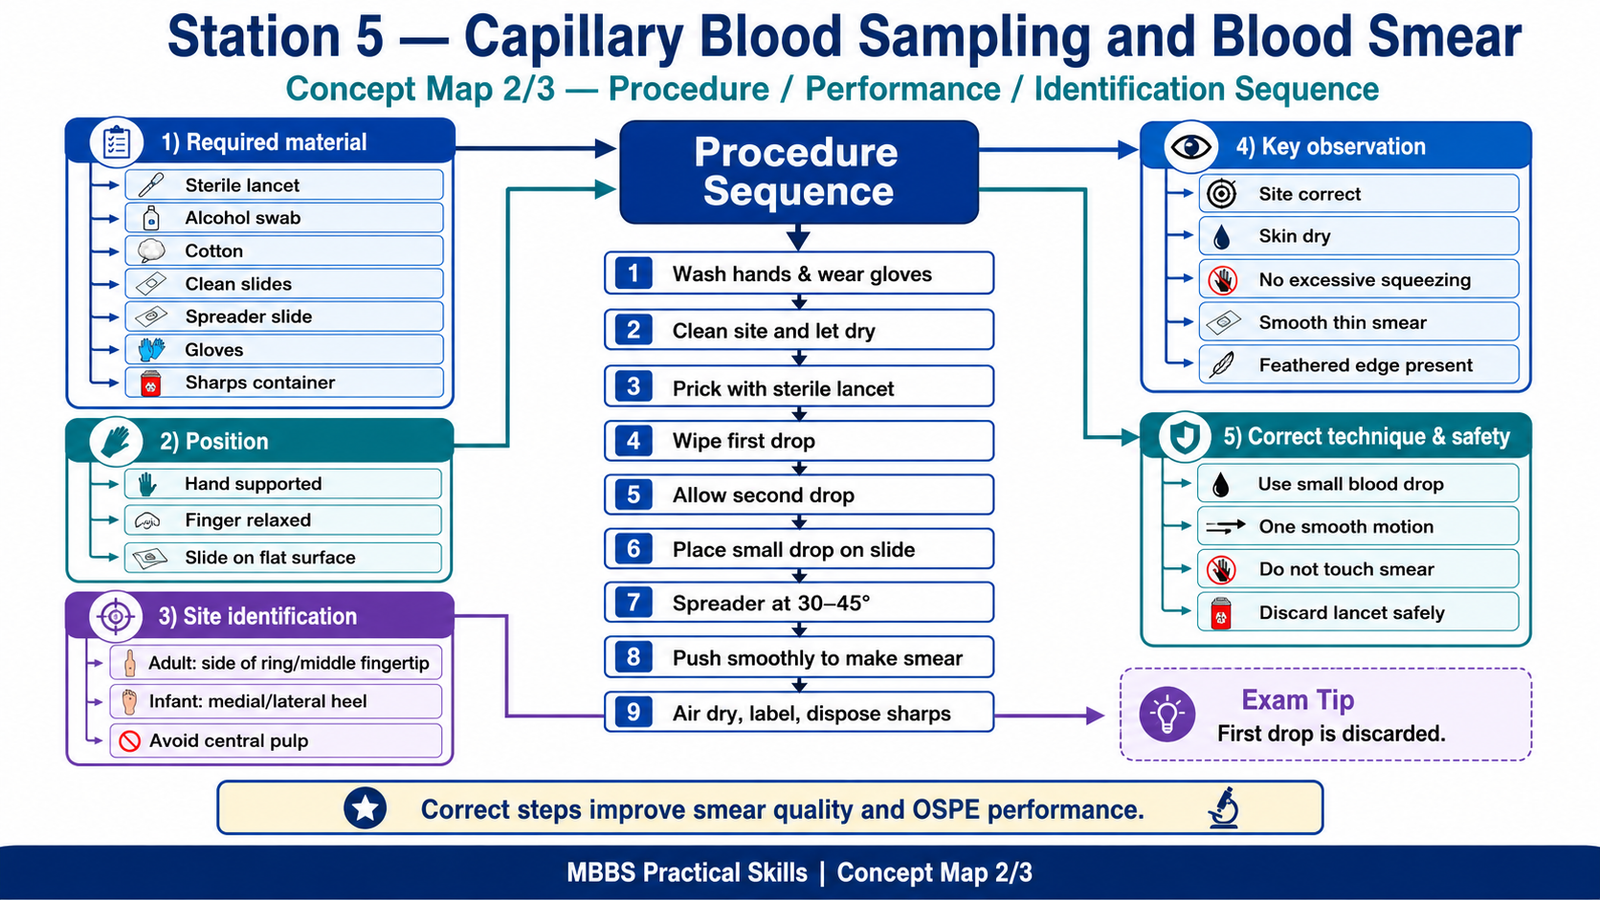
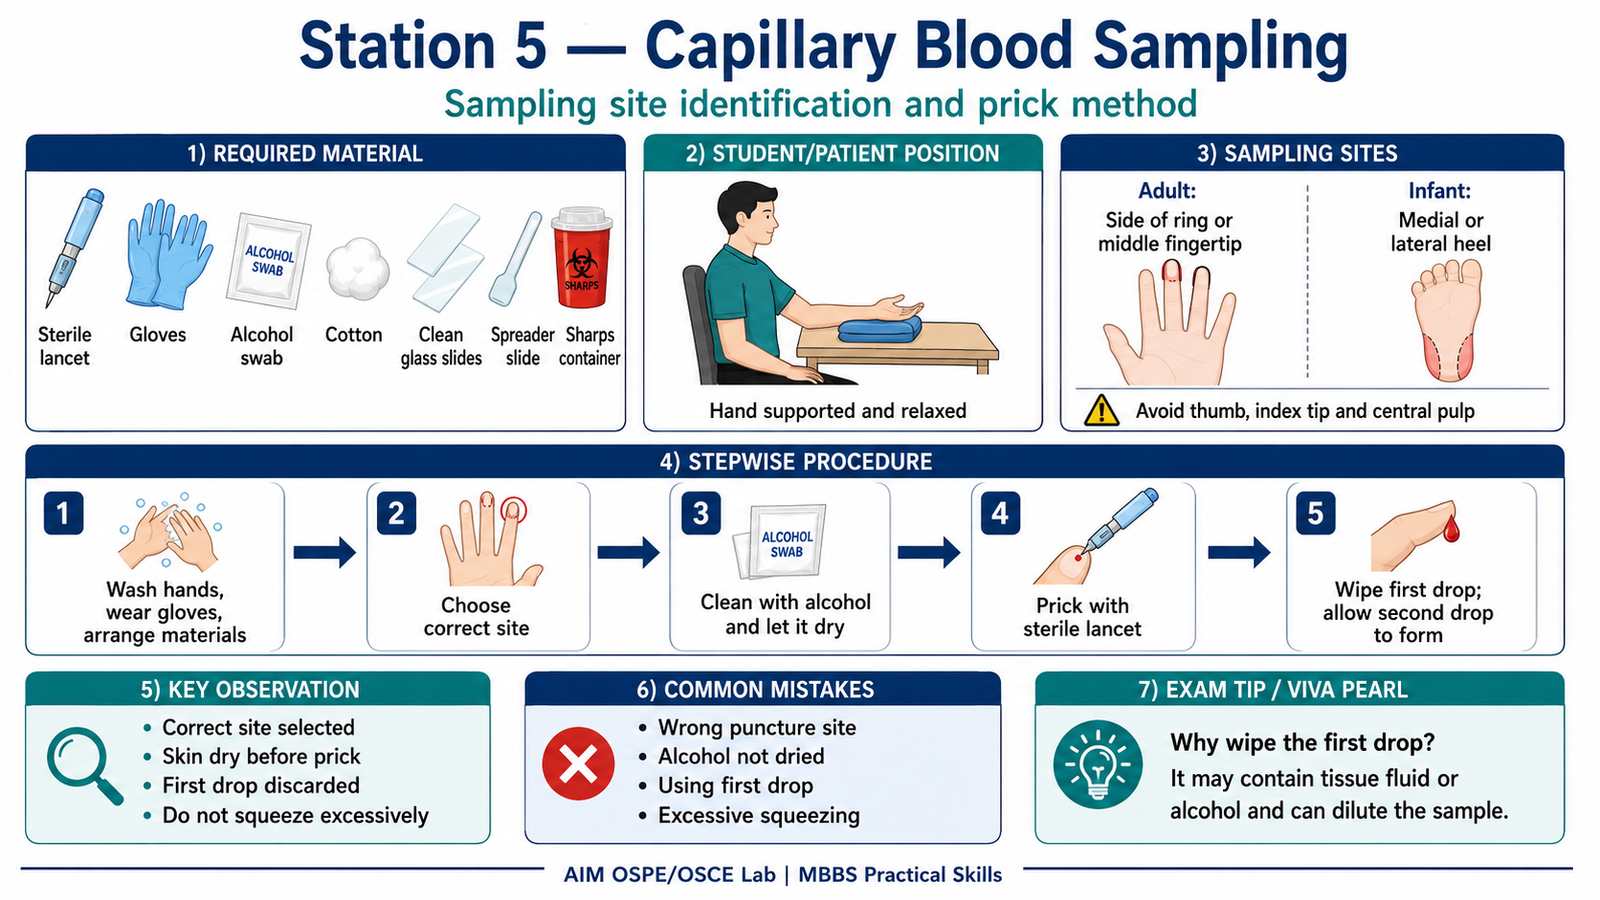
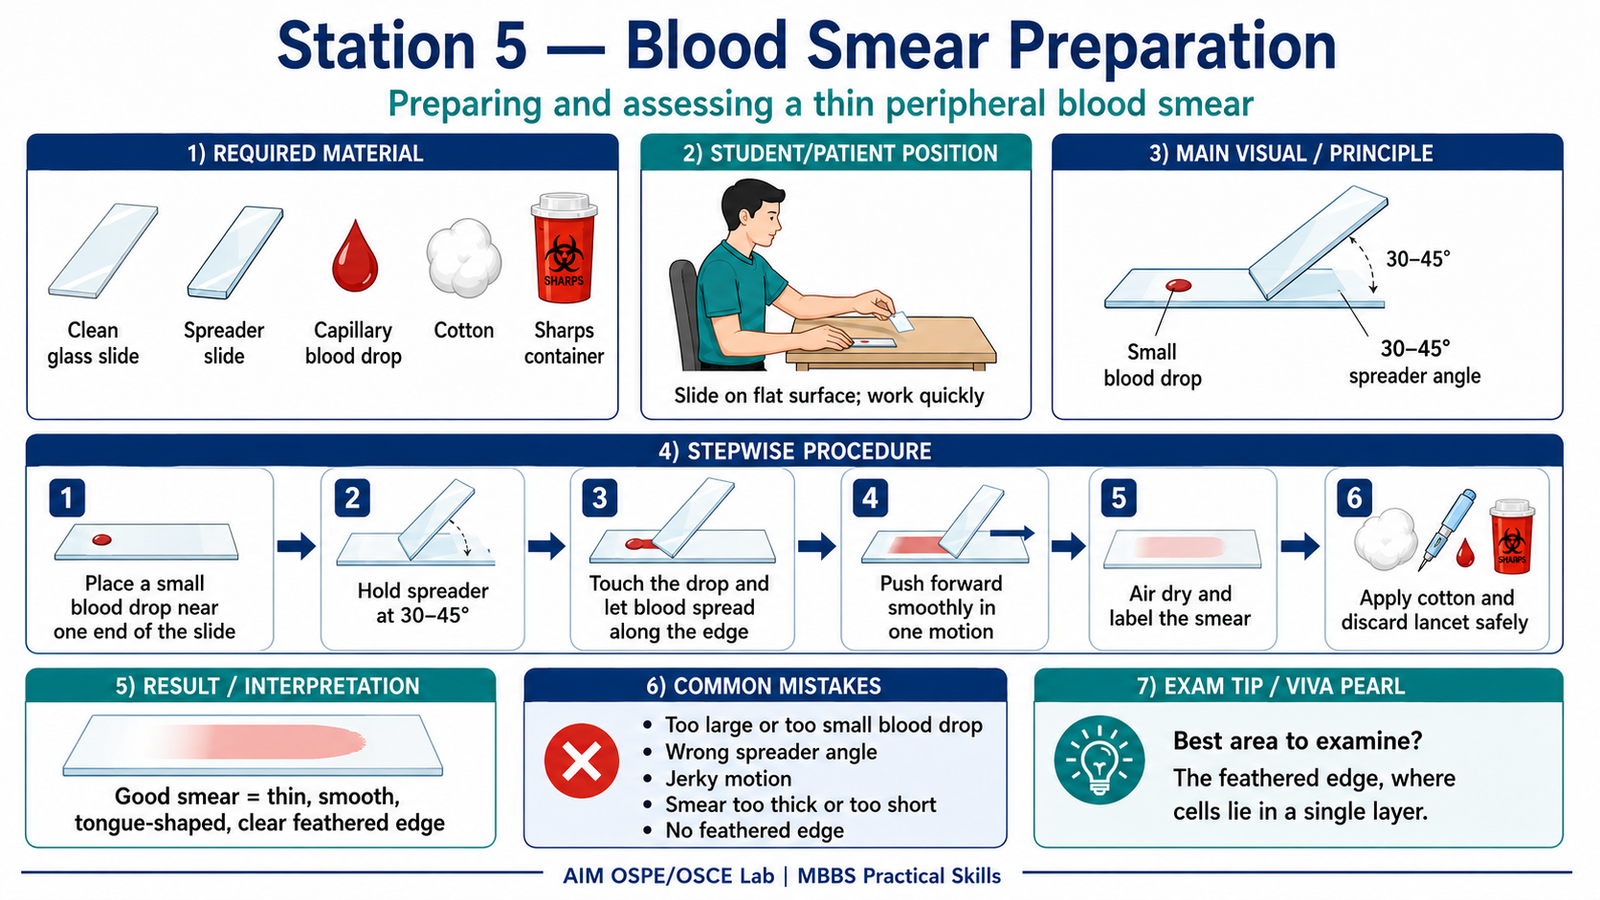
Required Material
- Disposable sterile lancet
- Cotton swabs
- 70% alcohol/spirit swab
- Clean glass slides
- Spreader slide
- Gloves
- Sharps disposal box
- Biohazard waste bin
- Microscope slide marker/pencil
- Leishman/Wright stain, if staining is required
- Microscope, if smear assessment is included
Student Task / Procedure
- Wash hands and wear gloves.
- Identify the correct capillary blood sampling site.
- Adult: side of fingertip, usually ring or middle finger.
- Infant: lateral or medial plantar surface of heel.
- Clean the selected site with 70% alcohol and allow it to dry.
- Hold the finger firmly and puncture the skin using a sterile disposable lancet.
- Wipe away the first drop of blood with dry cotton.
- Allow a fresh drop of blood to form without excessive squeezing.
- Place a small drop of blood near one end of a clean glass slide.
- Hold the spreader slide at about 30–45° angle in front of the blood drop.
- Pull the spreader back to touch the blood drop and allow blood to spread along its edge.
- Push the spreader smoothly and quickly forward to make a thin smear.
- Allow the smear to air dry.
- Dispose of the lancet immediately in the sharps container.
- Apply cotton pressure to the puncture site.
- Label the slide properly.
Observation / Identification Points
The student should demonstrate or identify:
- Correct site for capillary prick.
- Avoidance of central fingertip pulp and thumb.
- Proper cleaning and drying of the puncture site.
- Use of sterile disposable lancet.
- Wiping away the first blood drop.
- Avoidance of excessive squeezing of the finger.
- Correct size of blood drop.
- Correct spreader angle of 30–45°.
- Smooth, even, tongue-shaped blood smear.
- Thin feathered edge at the end of the smear.
- Proper disposal of sharps and contaminated material.
Result / Interpretation
A good peripheral blood smear should be thin, smooth, and tongue-shaped with a clear feathered edge. The cells should be evenly distributed, especially near the feathered edge, where red blood cells lie mostly in a single layer.
Principle:
A small drop of capillary blood is spread mechanically over a glass slide to create a thin film. This allows microscopic examination of blood cells, including red blood cells, white blood cells, and platelets.
Clinical Significance:
A properly prepared blood smear is useful for studying blood cell morphology, differential leukocyte count, anemia, infections such as malaria, platelet abnormalities, and other hematological disorders.
Common Student Mistakes
- Pricking the wrong site or pricking the central pulp of the finger.
- Not allowing alcohol to dry before puncture.
- Using the first drop of blood for smear preparation.
- Excessive squeezing of the finger, causing tissue fluid dilution.
- Using too large or too small a blood drop.
- Holding the spreader slide at an incorrect angle.
- Making a thick, irregular, short, or long smear.
- Not producing a feathered edge.
- Touching the smear before drying.
- Improper disposal of lancet or contaminated material.
AIM Feedback
A good capillary blood smear depends on three things: correct prick technique, correct blood drop size, and smooth spreading. Always choose a safe puncture site, wipe away the first drop, and avoid squeezing the finger too much. The smear should be thin with a feathered edge because this is the area where blood cells are best seen under the microscope. Poor technique can produce a thick or patchy smear, making cell identification difficult.
Most Important Viva Questions for This Topic
- What is capillary blood sampling?
Capillary blood sampling is the collection of blood from small superficial blood vessels by skin puncture. - Which finger is commonly used for capillary blood sampling in adults?
The ring finger or middle finger is commonly used. - Which site is used for capillary blood sampling in infants?
The lateral or medial plantar surface of the heel is used. - Why should the central pulp of the fingertip be avoided?
It is more painful and may cause deeper tissue injury. - Why is the first drop of blood wiped away?
It may contain tissue fluid and alcohol contamination, which can dilute or alter the sample. - Why should excessive squeezing of the finger be avoided?
It causes tissue fluid to mix with blood, leading to dilution and inaccurate results. - What is the ideal angle of the spreader slide?
Approximately 30–45°. - What are the features of a good blood smear?
It should be thin, smooth, tongue-shaped, and have a feathered edge. - What is the feathered edge of a blood smear?
It is the thin terminal part of the smear where cells are spread in a single layer. - Why is the feathered edge important?
It is the best area for microscopic examination of blood cells. - Name two common stains used for peripheral blood smear.
Leishman stain and Wright stain. - What is the clinical importance of a blood smear?
It helps assess blood cell morphology, differential leukocyte count, anemia, platelet abnormalities, and blood parasites such as malaria.
🖼️ Visual / Image Support
🧩 Concept Map / Interpretation Support