🩺 Station 10 — Examination of Abdomen
AIM OSPE/OSCE Lab — Practical Station | KMU Style | MBBS Practical + Viva
📌 Station Overview
Module: Cardiovascular System
Year: 1st Year MBBS
Focus: Identification • Procedure • Interpretation • Viva
Total Marks: 5
📋 Complete OSPE Station Content
Learning Target
By the end of this station, the student should be able to:
- Perform a basic abdominal examination on a standardized patient using proper positioning, exposure, and examination sequence.
- Identify key clinical findings on inspection, auscultation, percussion, and palpation and give a basic interpretation.
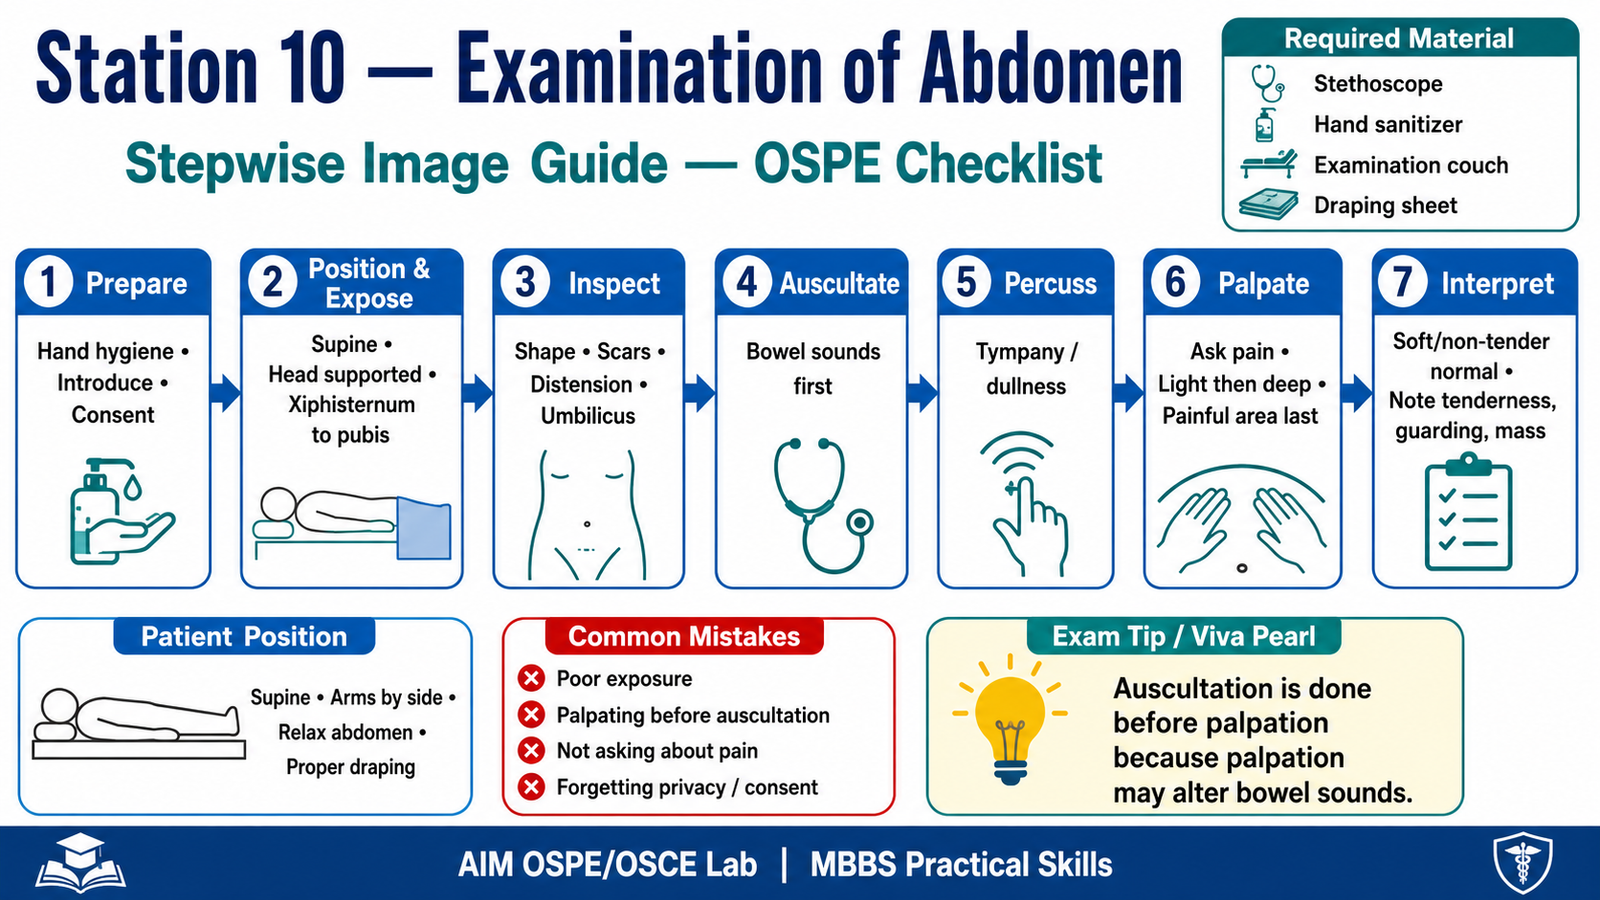
Required Material
- Standardized patient / simulated patient
- Examination couch
- Stethoscope
- Hand sanitizer
- Draping sheet
- Good light source
- OSPE checklist / marking sheet
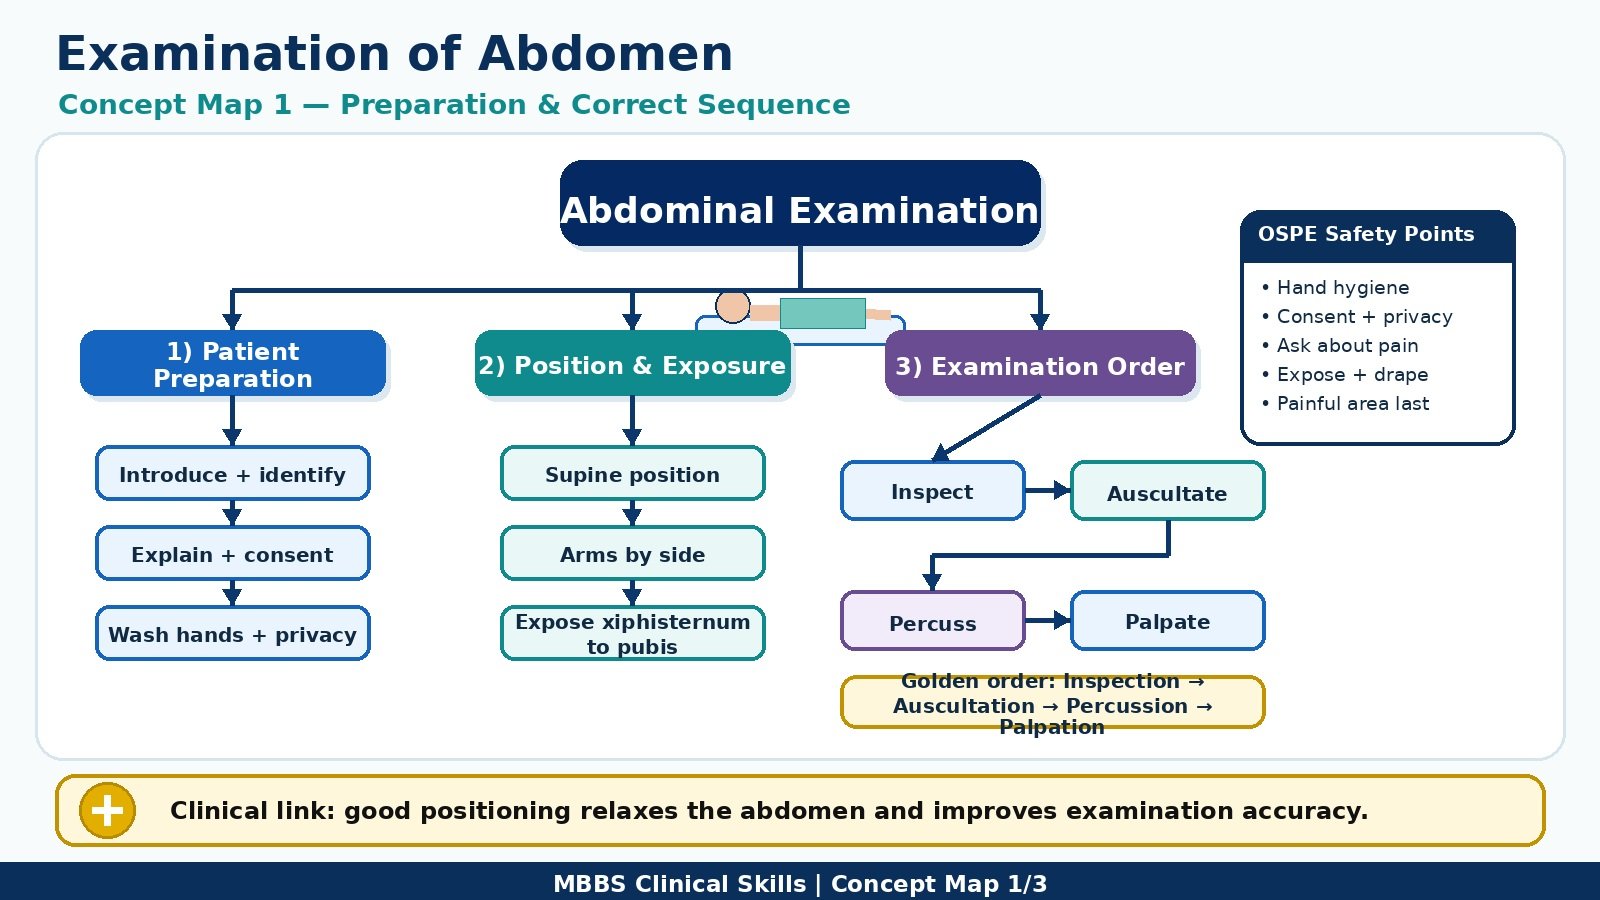
Student Task / Procedure
- Wash hands and introduce yourself to the patient.
- Confirm patient identity and explain the examination.
- Take consent and ensure privacy.
- Position the patient supine, head supported, arms by side.
- Expose the abdomen from xiphisternum to pubic symphysis, with proper draping.
- Ask if the patient has pain before touching the abdomen.
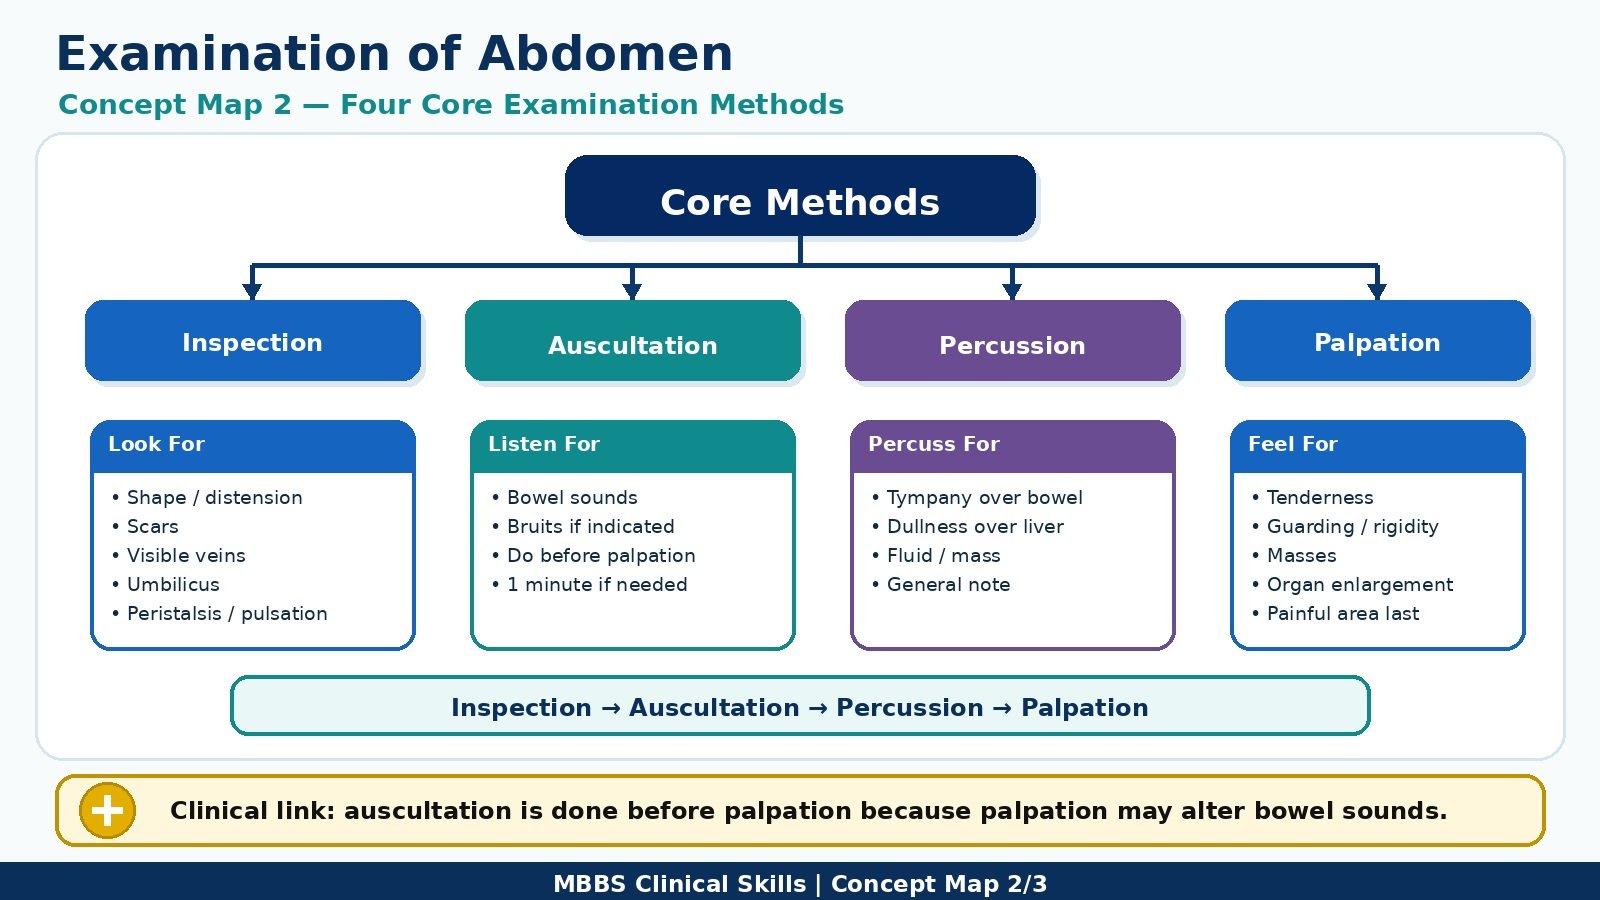
- Inspect the abdomen from the end and side of the bed.
- Auscultate bowel sounds and, if required, listen for bruits.
- Percuss the abdomen for general resonance or dullness.
- Palpate gently first, then deeper if appropriate.
- Comment on any basic abnormal finding.
- Thank the patient and cover the patient properly.
Observation / Identification Points
Students should demonstrate or identify:
- Proper hand hygiene, consent, privacy, and patient comfort
- Correct patient position: supine and relaxed
- Correct abdominal exposure with respectful draping
- Inspection for:
- abdominal shape / distension
- scars
- visible veins
- umbilicus
- visible peristalsis or pulsations
- Auscultation for:
- bowel sounds
- vascular bruits if indicated
- Percussion for:
- normal tympanic note over gas-filled bowel
- dullness over solid organs / fluid
- Palpation for:
- tenderness
- guarding
- rigidity
- masses
- organ enlargement
- Correct clinical sequence:
Inspection → Auscultation → Percussion → Palpation
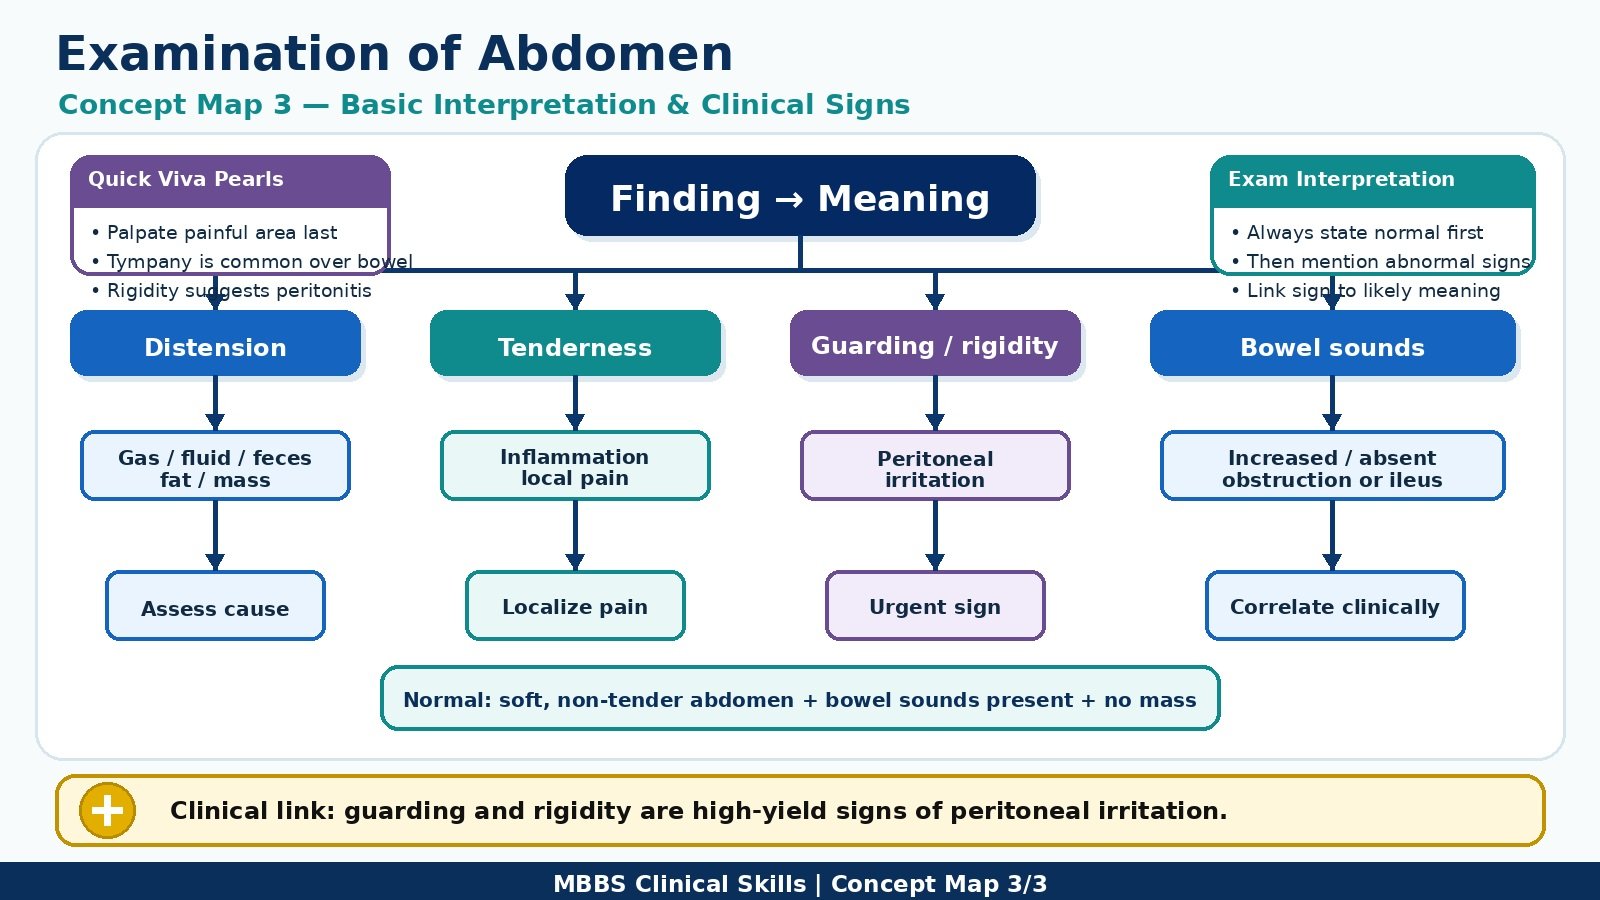
Result / Interpretation
A normal abdominal examination shows:
- Abdomen soft and non-tender
- No visible distension, scars, abnormal veins, or visible peristalsis
- Bowel sounds present
- Percussion mostly tympanic with expected liver dullness
- No palpable mass or organomegaly
Clinical significance:
- Tenderness may suggest inflammation.
- Guarding or rigidity may suggest peritonitis.
- Distension may occur due to gas, fluid, feces, fat, or mass.
- Absent or exaggerated bowel sounds may indicate intestinal obstruction or ileus.
Viva Questions
1. What is the correct sequence of abdominal examination?
Inspection, auscultation, percussion, then palpation.
2. Why is auscultation done before palpation in abdominal examination?
Because palpation may alter bowel sounds.
3. What should be the proper exposure for abdominal examination?
From xiphisternum to pubic symphysis, with proper draping.
4. What does abdominal guarding indicate?
It may indicate pain, inflammation, or peritoneal irritation.
5. What is the normal percussion note over most of the abdomen?
Tympanic note due to gas in bowel loops.
Marking Scheme
Total Marks: 5
| Component | Marks |
|---|---|
| Correct identification / performance | 2 |
| Key observation / procedure steps | 1 |
| Interpretation / principle | 1 |
| Viva answer | 1 |
Common Student Mistakes
- Starting palpation before auscultation
- Poor exposure or failure to maintain patient privacy
- Pressing deeply without first asking about pain
- Forgetting to observe from both end and side of the bed
- Not thanking and covering the patient after examination
AIM Feedback
To improve your abdominal examination, follow a fixed sequence every time: prepare the patient, inspect, auscultate, percuss, and palpate. Keep the patient relaxed and comfortable. Always begin palpation gently and examine painful areas last. In OSPE, marks are gained not only by finding signs but also by safe, respectful, and systematic examination technique.
🖼️ Visual / Image Support
🧩 Concept Map / Interpretation Support